Installation & Setup
System Requirements
This section describes the software and hardware prerequisites for installing arivis Hub DMS.
Software requirements of the operating system
Windows Server 2022 or higher
Database
SQL-Server (Express) Version 2016 (v13.0) or higher
Hardware requirements
|
Memory |
16 GB (required) 32 GB (recommended) |
|
Processor |
Quad-core@2GHz (required) Octa-core@2.4GHz (recommended) |
|
Storage |
For data redundancy: RAID1 or RAID6 (recommended) |
|
Network |
1Gb/s (required) 10Gb/s (recommended) |
Installing the Components of arivis Hub DMS
- You have the necessary files for installation on your machine.
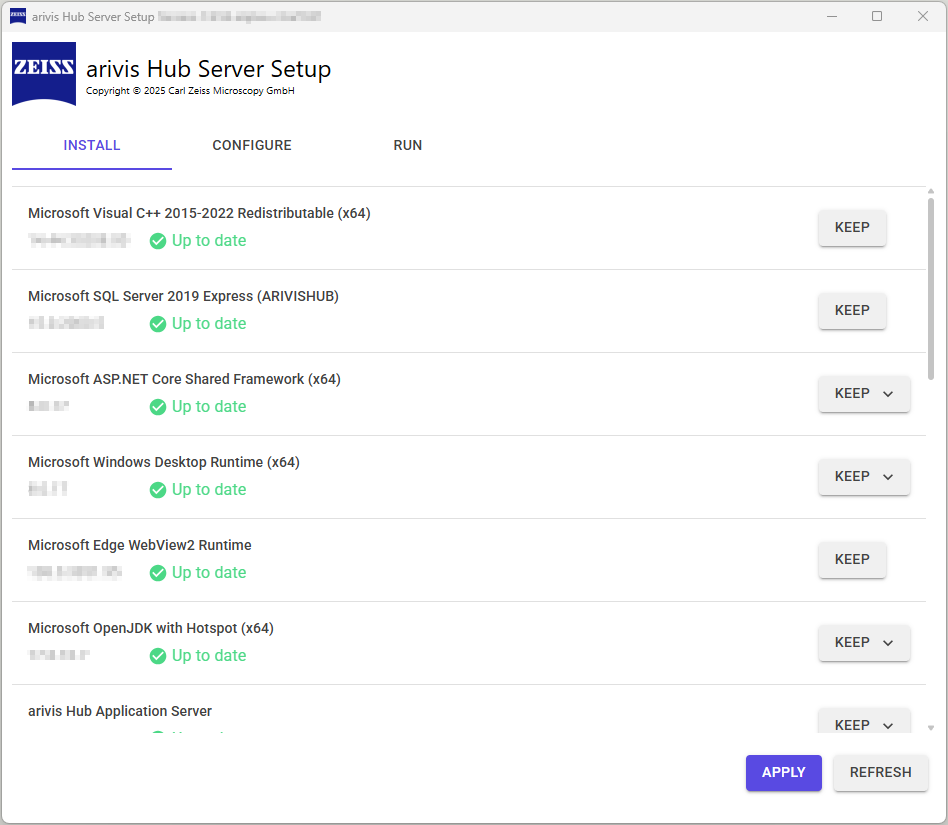
- Open the folder with the installation and double click the ah-setup.exe for the arivis Hub DMS installation.
- The arivis Hub Setup dialog opens.
- On the Install tab, the individual components are displayed. The dropdown on the right shows/selects which action is performed for the respective component.
- Select the actions for each component. If you do not need to install the Microsoft SQL Server Express because it is already installed, for example, select Keep to use an existing instance or Skip to use an instance on a remote server. Update the connection string in the Configure tab to point to your existing Microsoft SQL Server installation. We recommend installing all components.
- The components for installation are defined.
- Go to the Configure tab to define your setup, see Configuring the Software with the Configure Tab.
Configuring the Software with the Configure Tab
Using an Existing SQL Server Installation
In case you are using an existing SQL server installation, note the following:
- The SQL Server is accessed with the credentials of the respective Windows service, in the standard case with the SYSTEM account. If the arivis Hub DMS services and SQL server are installed on the same PC and arivis Hub DMS is trying to use the SYSTEM account, the SQL Server needs the required access rights for the SYSTEM account as well.
- For access to a remote instance, this is not possible. You either have to adapt the connection string (User Id=...;Password=... instead of Integrated Security=SSPI), or the service must be reconfigured so that it runs under a (technical) user account.
Configuration of arivis Hub DMS
During installation, the shortcut arivis Hub Setup is created and added to the Windows start menu in the folder for Carl Zeiss Microscopy. This entry can be used to configure arivis Hub DMS after the installation and initial setup and offers the functionality of the Configure and Run tab.
- You have defined the action for the components on the Install tab.
- You are on the Configure tab.
- For Host Name or IP Address, select the server name or IP address, under which the services are accessible in your network, from the dropdown list. If the default localhost is used, the services are only accessible from the local server machine. We recommend using the server hostname, or its primary/public IP address.
- For Hosting Scheme, select if you want to set up your server communication with the http or the https protocol.
- If you select https, the SSL Certificate option is displayed. If you want to use https (which is highly recommended for security reasons), your server has to be prepared for it. This is usually done by installing an appropriate server certificate (including the private keys used for SSL encryption) into the machine wide certificate store of the Windows server. The server name in the certificate must match the public DNS name under which the server is reachable (configured in the server host name field of the Settings tab). For details, contact your IT department.
- For SSL Certificate, select the respective SSL certificate. A list of available certificates is displayed in the dropdown menu. Note that this list displays the (unique) names of the SSL certificates installed on the local computer/machine. For questions or information about SSL certificates, contact your IT department. Note that the SSL certificate needs to be installed in the Personal folder of the local computer certificate store, and that the so-called Root Authority Certificate has to be installed in the Trusted Root Certification Authorities folder of all clients!
- For Data Path, enter the name of the directory where the File Server stores its files. To use environment variables, enclose them in percent signs, e.g. %ProgramData%. Make sure you have enough disk space to save the desired files. When you use external workers, the Data Path setting of the central server must be identical to the Data Path setting of every worker, see Setup with Multiple Workers.
- For License Key Id, you can enter a license key and only the licenses from this key are taken into account. If you do not define a key here, arivis Hub DMS consumes licenses from any of the available keys. Available license key ids can be found on the license manager web interface at http://localhost:1947 after the arivis License Tool component has been installed and the license key has been activated.
- For Application Server Port, enter the TCP port number of the Application Server service. We recommend using the default (8081) unless there is a conflict with other services running on the server.
- For Application Server Connection String, enter the connection string of the Application Server database. This needs to be adjusted when an existing SQL Server instance is used. Ask your database administrator for the connection string.
- For Keycloak Server Port, enter the TCP port number of the Keycloak Server service. We recommend using the default (8080) unless there is a conflict with other services running on the server.
- For Keycloak Server Connection String, enter the connection string of the Keycloak Server database. Adjust this when an existing SQL Server instance is used. Ask your database administration for the connection string.
- For Management Server Port, enter the TCP port number of the Management Server service configured with http. We recommend using the default (8088) unless there is a conflict with other services running on the server.
- For Object Server Port, enter the TCP port number of the Object Server service. We recommend using the default (8083) unless there is a conflict with other services running on the server.
- For arivis Hub Pipeline Server Port, enter the TCP port number of the Pipeline Server service. We recommend using the default (8866) unless there is a conflict with other services running on the server.
- For Temporal Server Port, enter the TCP port number of the Temporal Server service. We recommend using the default (8085) unless there is a conflict with other services running on the server.
- For Temporal UI Port, enter the TCP port number for the user interface of the Temporal Server service. We recommend using the default (8086) unless there is a conflict with other services running on the server.
- For Tile Server Port, enter the TCP port number of the Tile Server service. We recommend using the default (8084) unless there is a conflict with other services running on the server.
- If you use the image analysis and use external workers, deactivate Enable Sub Image Analysis on the central server to avoid excessive resource consumption, see Setup with Multiple Workers. It is activated by default, which is suitable and required for simple single-server setups.
- If you want to use your server as an archive in ZEN core, activate Setup Users and Groups.
- Click Apply.
- The installation starts. Once a component is installed, a green checkmark is displayed for the component.
- After successful installation of all components, the settings are applied and validated. The displayed status message informs you if the operation is in progress, if it succeeded, or if it failed.
- Go to the Run tab, see Checking the Functionality with the Run Tab.
Checking the Functionality with the Run Tab
- You installed the components on the Install tab and applied the settings on the Configure tab.
- Select the Run tab and check if all services are green and running.
- Note that the arivis Hub Application Server entry is only marked green, if you have activated the license.
- You have the following options:
Start: Starts the service.
Stop: Stops the service.
Check: Verifies that the service is responding to HTTP requests.
Activate License: Starts the process to activate the license, see Activating the License.
Launch Web Frontend: Opens the user interface of the respective server in the browser. - Check the log level for the components and change them with the dropdown, if necessary. Changing the log level affects any new messages that the server writes to the server log. A higher log level affects the performance of the server. For a description of the individual levels, see Log Levels.
- The log levels are set.
- Click Refresh.
- You have installed and set up arivis Hub DMS.
See also
Activating the License
- All arivis Hub DMS components are installed.
- You are on the Run tab and are connected to the internet.
- For the arivis Hub Application Server entry, select Activate License from the dropdown on the right.
- The arivis License Tool opens. If you need additional information, or your machine has no internet access, click Help for further information about the tool.
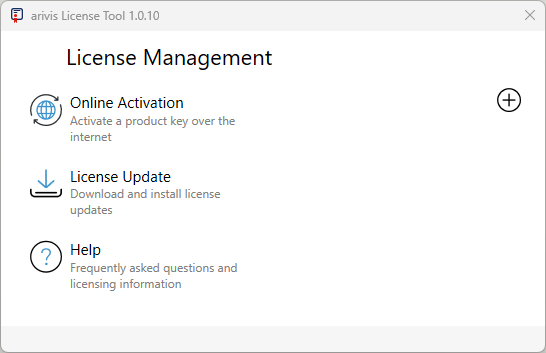
- Click Online Activation.
- A new page opens.

- Enter your Product Key and click Activate.
- The license is activated.
- Close the arivis License Tool.
- The tool is closed.
- Go back to the Run tab of the arivis Hub Setup.
- The Run tab is open.
- For the arivis Hub Application Server entry, select Start from the dropdown on the right.
- The list entry turns green.
- The license is activated.
Setup with Multiple Workers
You can use arivis Hub DMS in a setup with one or multiple workers. In this setup the image analysis should be disabled on the central server to avoid excessive resource consumption (which might degrade system performance). This can be done on the Configure page in the arivis Hub Server Setup of the central server by deactivating Enable Sub Image Analysis. If needed, the central server can be used as an additional worker, but this requires an arivis Hub DMS Analysis Workers license for the central server (in addition to one license for each worker).
To install and configure a worker, run ah-setup.exe worker (i.e. with command line argument "worker") on a worker PC. This opens the arivis Hub Worker Setup, with which you install a subset of only those arivis Hub DMS components that are needed to run image analysis. For general information on installation and configuration of arivis Hub DMS, see Installing the Components of arivis Hub DMS and Configuring the Software with the Configure Tab.
When you use external workers, the Data Path setting of the central server must be identical to the Data Path setting of every worker. This usually means that the central server must be configured with a UNC path (e.g. \\my-server\my-share), even when the data is stored on a local disk directly attached to the central server. The reason is that the central server generates some configuration files with absolute paths which are then interpreted by the worker. The worker must be able to access the data files using the path names generated by the central server. Creating the network share and granting required access rights must be done manually by your IT support.
The arivis Hub Workflow Worker service needs to have read and write access to the Data Path directory that is also used by the central server to get access to the image data and to store image analysis results. By default, the service runs in the SYSTEM account (the local system account). The local system account might not have the required access rights on the network share by default. You/your IT support needs to setup a working network connection, as the details are highly dependent on your IT environment. If an Active Directory domain is used, sharing with "Domain Computers" is one possible solution. Otherwise, the arivis Hub Workflow Worker service might need to be reconfigured to run under a user or service account which has access to the network share. A recommended option are gMSAs ("Group Managed Service Accounts").
The worker PC requires a TCP connection to the temporal service running on the central server. The default port number is 8085. The Windows firewall is already opened for the Temporal.exe process on the central server during installation. If there are additional firewalls or network protection software, TCP connectivity from the workers to the central server needs to be ensured.