ZEN Connect Tool
The ZEN Connect tool provides a layer's view and a project view of image data that you have acquired for the ZEN Connect project. Every image that you have acquired for the ZEN Connect project is listed. As you acquire or import more image data, the new image data is listed in the views.
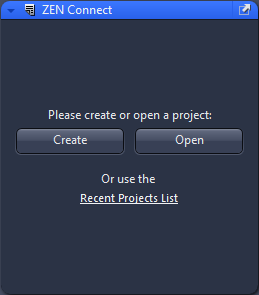
The ZEN Connect tool offers different options to open a ZEN Connect project or to create a new ZEN Connect project.
Alternatively, you can create a new ZEN Connect project via File > New Document. For more information, see New Document Dialog.
The ZEN Connect tool displays the following:
- Images that have been acquired for the ZEN Connect project.
- Images that have been imported to the ZEN Connect project.
- Position of the image in the project or the layers.
- Non image data added to the ZEN Connect project.
ZEN Connect Project view
|
1 |
Sample holder |
|
2 |
Imported Data |
|
3 |
On top, the session node is displayed. It contains the following information. Subordinated, the acquired images are listed. Here: LM (Microscope) |
|
4 |
Image Information |
|
5 |
Z-Stacks which are opened in the ZEN Connect 3D view are displayed with another icon in the tree view. |
 is displayed for a z-stack image.
ZEN Connect Project Layer view
Images in your ZEN Connect project are displayed in the Image View according to its position in the Layers View. With drag & drop, you can move images over and under other images. You can also hide them completely  . For more information, see Moving or Hiding Images. Additionally, you can see the objective magnification with which the image was acquired and if an image is a z-stack
  .
.
Button Bar
|
Parameter |
Description |
|
|---|---|---|
|
Opacity |
Changes the opacity of layers. The overall opacity determines to what degree it obscures or reveals the layer beneath it. A layer with 1% opacity appears nearly transparent, whereas one with 100% opacity appears completely opaque. |
|
|
Alignment |
Only available if you have selected one or more images or a session. |
|
|
– |
Align |
Activates the alignment process for the selected data, see Activating the Alignment Process. |
|
– |
Align system |
Activates the alignment process for the current microscope session, see Activating the Alignment Process. |
|
– |
Manual Alignment Wizard |
Opens the wizard for manual alignment, see Aligning Images in the Manual Alignment Wizard. |
|
– |
Point Alignment Wizard |
Opens the wizard for point alignment, see Aligning Images in the Point Alignment Wizard. |
|
– |
Point Alignment 3D Wizard |
Opens the wizard for 3D point alignment, see Aligning Images in the 3D Point Alignment Wizard. |
|
– |
Align Two Images in 3D |
Opens the selected images directly in alignment mode in the ZEN Connect 3D view, see also Aligning Images in the ZEN Connect 3D View. |
|
Import |
Starts the currently selected operation to add and/or import an image. Click on the arrow button to select an import operation, see also Importing Data. |
|
|
– |
Add image |
Opens the file browser to add an image, see Adding an Image to the ZEN Connect Project. |
|
– |
Add image from storage |
Opens the Stored Documents dialog to add an image from the ZEN Data Storage, see Adding an Image to the ZEN Connect Project. |
|
– |
Import non-image data |
Opens the file browser to select non-image data for an import, see Importing Non Image Data. |
|
– |
Import SmartFIB z-stack |
Opens the file browser to import a SmartFIB z-stack, see Importing a SmartFIB Stack into ZEN Connect. |
|
– |
Add dataset |
Opens the file browser to add a dataset, see Adding Datasets when Adding Images. |
|
Export |
Starts the currently selected operation to export an image. Click on the arrow button to select an export operation. |
|
|
– |
Single Image Export |
Opens the wizard to export the selected data in one single image, see Exporting Single Image Data. |
|
– |
Video Export |
Opens the wizard to export the selected data as a video, see Exporting a ZEN Connect Project as a Video. |
|
– |
Export Project |
Opens a file browser to export your current ZEN Connect project, see Exporting a ZEN Connect Project from ZEN Data Storage. |
|
New Session |
Creates a new session, see Starting a New Session. |
|
|
Context menu |
||
|
– |
Zoom to |
Zooms one or more selected images into the center of the Image View, see Zooming Images. |
|
– |
Zoom to 100% |
Zooms to the selected image in the Image View and displays it at 100% scale, see Zooming Images. |
|
– |
Show/Hide |
Toggles the visibility of an image or a session, see Moving or Hiding Images. |
|
– |
Open image(s) in ZEN |
Opens the selected image(s) in ZEN, see Opening Images in ZEN. |
|
– |
Open Attachment |
Only available for non-image data. |
|
– |
Show in Explorer |
Locates an image or file on your computer, see Showing an Image in the Explorer. |
|
– |
Remove Data |
Removes the selected image from the ZEN Connect project, but does not delete it from the computer, see Removing Images from the ZEN Connect Project. |
|
– |
Delete |
Only visible for non-image data. |
|
– |
Rename Data |
Renames an image, see Renaming Images in a ZEN Connect Project. |
|
– |
Align Data |
Activates the alignment process for the selected data, see Activating the Alignment Process. |
|
– |
Single Image Export |
Opens the wizard to export the selected data in one single image, see Exporting Single Image Data. |
|
– |
Video Export |
Opens the wizard to export the selected data as a video, see Exporting a ZEN Connect Project as a Video. |
|
– |
Add image |
Opens the file browser to add an image, see Adding an Image to the ZEN Connect Project. |
|
– |
Add image from storage |
Opens the Stored Documents dialog to add an image from ZEN Data Storage, see Adding an Image to the ZEN Connect Project. |
|
– |
Import SmartFIB z-stack |
Opens the file browser to import a SmartFIB z-stack, see Importing a SmartFIB Stack into ZEN Connect. |
|
– |
Show in 3D |
Only available if one or two z-stack images are selected in the tree view. |
|
– |
New Session |
Starts a new session. The images acquired next will be subordinated below a new session node, see Starting a New Session. |
|
– |
Clear alignment |
Resets the alignment and places the selected image at its initial position. |
|
– |
Zoom to extent |
Resets the view space of the Image View to be centered on the holder with a field of view (FOV) that includes all visible images in the project, see Zooming to Extent. |
|
– |
Export Project |
Opens a file browser to export your current ZEN Connect project, see Exporting a ZEN Connect Project from ZEN Data Storage. |
|
– |
Import non-image data |
Opens the file browser to select non-image data for an import, see Importing Non Image Data. |
