Manual Extended Focus
This module allows you to create one single image out of several image acquisitions with different focus positions. The sharp areas of all acquisitions are combined to one consistently sharp image, the so called EDF image (EDF = Extended Depth of Focus). To work with the Manual Extended Depth of Focus functionality, it has to be activated under Tools > Toolkit Manager. The tool Manual Extended Depth of Focus is displayed on the Locate tab.
Preparing a Manual EDF Acquisition
- You are on the Locate tab.
- Click the Live button to open the live image.
- The button changes to a Stop button during a live image.
- Look for a suitable position on the sample.
- Click Stop to switch off the live image.
- You have made all necessary preparations to acquire an image with manual EDF. You can now continue by acquiring an EDF image using one of two modes, see Acquiring EDF Images with Timer or Acquiring EDF Images with F12 Key.
See also
Acquiring EDF Images with Timer
In this mode, a new image is automatically added after a defined interval. In the time period between the acquisitions you can set a different focus position. After each recording a new image with extended depth of focus is calculated immediately. After finishing the acquisition, the final image is the one that was calculated last.
- You have opened the Manual Extended Depth of Focus tool on the Locate tab.
- If you want to store all acquired images in memory for a complete recalculation of the EDF image after each single acquisition, activate Z-Stack. Note that the more images you acquire, the more time it takes to calculate the EDF.
- Click Timer.
- Adjust the length of your interval with the Interval slider or input field. Set the interval long enough so that you can comfortably move the specimen to a new focus position. After the time elapses, an image is automatically acquired at your current position.
- Click Start to acquire the images.
- The Central Screen Area is split into two parts. On the left you can see the current live image, on the right you see the currently calculated extended focus image.
- Move to a new focus position after each acquisition.
- Repeat these steps until you have sharp images from all desired areas of your sample.
- Click Stop to finish your acquisition. If you want to pause the acquisition, click Pause.
- You have finished the acquisition of the manual EDF image. The resulting image is displayed in the Central Screen Area.
See also
Acquiring EDF Images with F12 Key
In this mode you can manually record a new image by pressing the F12 key on your keyboard. With this you can achieve different time intervals between the individual acquisitions when you change the focus position.
- You have opened the Manual Extended Depth of Focus tool on the Locate tab.
- If you want to store all acquired images in memory for a complete recalculation of the EDF image after each single acquisition, activate Z-Stack. Note that the more images you acquire, the more time it takes to calculate the EDF.
- Click F12 Key.
- Click Start to acquire the images.
- The Central Screen Area is split into two parts. On the left you can see the current live image.
- Press F12 on your keyboard to acquire an image manually.
- The calculated extended focus image on the right side is updated.
- Move to a new focus position.
- Repeat the last two steps until you have sharp images from all desired areas of your sample.
- Click Stop to finish your acquisition. If you want to pause the acquisition, click Pause.
- You have finished the acquisition of the manual EDF image. The resulting image is displayed in the Central Screen Area.
See also
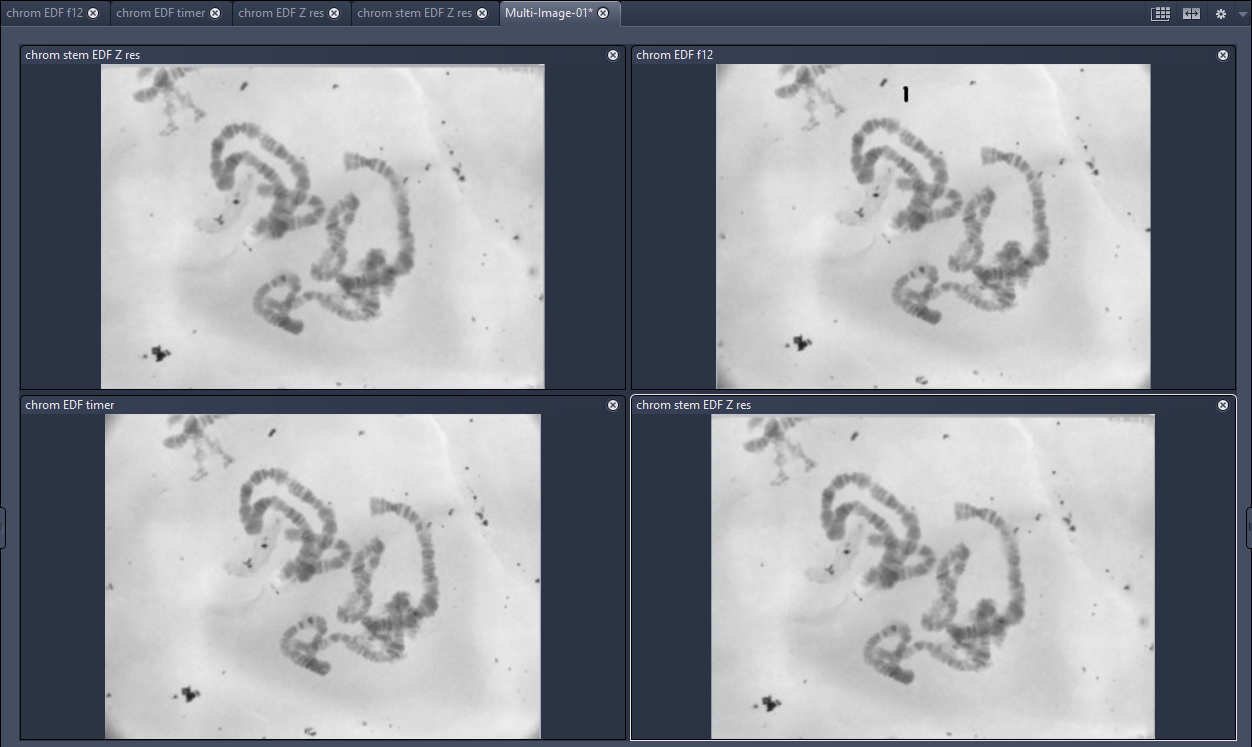
Comparing Images Using Split Display
- You have already acquired images with an extended depth of focus which you want to compare to each other.
- To compare images click
 .
. - The split view opens.
- On the Split Display view options tab, define an arrangement of two Columns and two Rows.
- Four image containers are displayed in the Center Screen Area.
- Move the different images from the Image and Documents gallery into the Center Screen Area via Drag & Drop.
- The comparison of all four methods (Timer, F12-key, Z-stack without shift, Z-stack with shift) shows identical resulting images.
See also
Manual Extended Depth of Focus Tool
|
Parameter |
Description |
|
|---|---|---|
|
Z-Stack |
Activated: Stores all acquired images in memory and calculates the EDF image based on all images after each individual acquisition. Note that the more images you acquire, the more time it takes to calculate the EDF. Deactivated: Calculates the EDF image based on the last acquired image and the previously calculated EDF image. Thus this mode is only additive and does not store all acquired individual images nor does it recalculate the entire image stack. |
|
|
Quality |
Selects the quality level that you want the function to work with. |
|
|
Registration Method |
Selects the method (or combination of methods) that is used to align the images. |
|
|
- |
Translation |
The neighboring sections of the z-stack image are shifted in relation to each other in x and y direction. |
|
- |
Rotation |
The neighboring sections of the z-stack image are rotated in relation to each other. |
|
- |
Iso Scaling |
The magnification is adjusted from section to section. |
|
- |
Skew Scaling |
The neighboring sections of the z-stack image are corrected for skewness/shearing. |
|
- |
Affine |
The neighboring sections of the z-stack image are shifted in x and y direction, rotated and the magnification is adjusted from section to section. |
|
Interpolation |
Selects the interpolation that is performed if a pixel is calculated from several individual pixels. |
|
|
- |
Nearest Neighbor |
The output pixel is given the gray value of the input pixel that is closest to it. |
|
- |
Linear |
The output pixel is given the gray value resulting from the linear combination of the input pixels closest to it. |
|
- |
Cubic |
The output pixel is given the gray value resulting from a polynomial function of the input pixels closest to it. |
|
Mode |
||
|
- |
Timer |
Acquires an EDF (Extended Depth of Focus) image automatically after a defined time interval. |
|
- |
F12 Key |
Acquires an EDF image when you press F12 key. |
|
Interval |
Only active if Timer is selected. |
|
|
Start |
Starts the acquisition of an image series. |
|
|
- |
Pause/Continue |
Pauses/Continues the acquisition. |
|
- |
Stop |
Stops the acquisition. |