User Management
The software can be used with or without user management.
Without user management
User management is disabled by default. This means that every user has the same rights. No username or password is required and there are no user roles within the software (i.e. the user can perform any action).
With user management
If user management is enabled, each user has an account which is used to log into the software. Each user account is assigned to one or more user groups. User groups define the privileges (actions the user can perform in the software) for the users assigned to the group. Groups typically correspond to the roles in the software (e.g. Administrator, User). However, you can also create new user groups if required. Typically, one user is assigned to one group, but can also be assigned to multiple user groups if required. Users have the sum of all permissions of the groups to which they are assigned.
When you start the application with user management, you have to enter your username and password on the login screen. Additionally, to the general login, the last three logged in users on this machine are displayed on the login screen.
You can also configure a login with your Windows account. In this case an additional login button for Windows accounts (USERNAME@DOMAIN) is displayed on the login screen.
ZEN Data Storage
If you use the ZEN Data Storage and user management, the users are the data storage specific ones.
Default user and password
If you have enabled the user management and not assigned/changed a password, the password for the default user is zeiss. If you are using ZEN Data Storage, the default users and passwords can be found in the installation guide of ZEN Data Storage.
Creating a New User
- Click Tools > Users and Groups....
- The User and Group Management dialog opens.
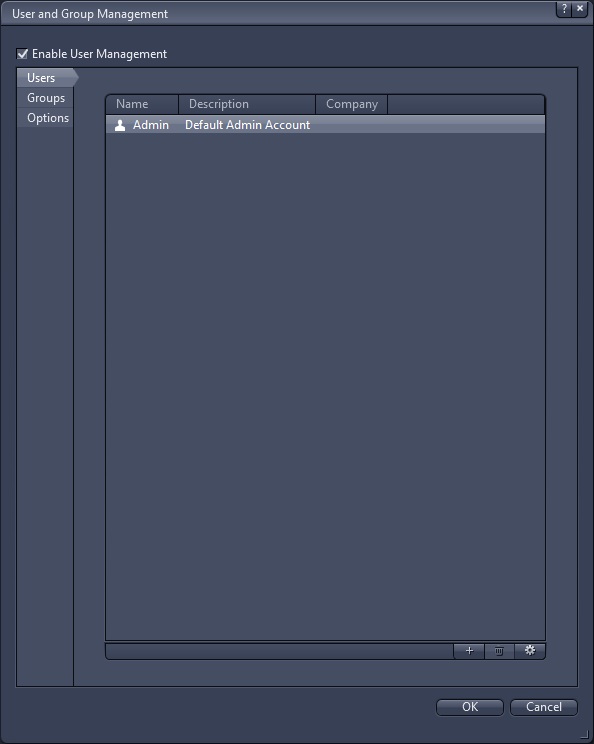
- Activate Enable User Management checkbox if it is not already activated and restart the software.
- User management is active.
- In the Users tab, click
 .
. - The New User dialog opens.
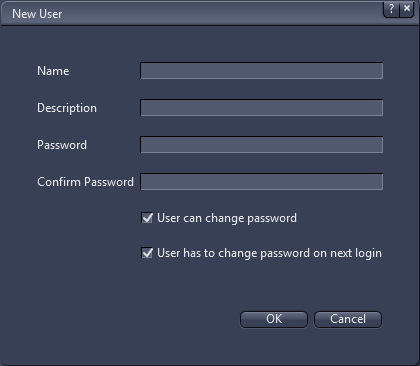
- Enter a Name for the new user. Optionally, enter a Description and/or enter and confirm a Password for the new user.
- Click OK.
- You have successfully created a new user. All settings are effective with the next start of the software. Make sure that you remember password, username, etc. Now you can add the user to a specific user group, see Adding Users to a Group.
Creating a new group
- You are in the User And Group Management dialog (Tools > Users and Groups...).
- Enable User Management is activated.
- Click Groups.
- The tab displays all currently configured user groups.
- Click .
- The New Group dialog opens.
- Select the Type of group.
- Enter a Name for the new group. Note: Do not use a backslash (\) in the group name, except for an Active Directory group.
- Enter a Description for the group. This step is optional.
- Click OK to close the New Group dialog.
- The respective group is added to the tab.
- Click OK to close the User and Group Management dialog.
- You have created a new group. You can now add users to this group (see Adding Users to a Group).
See also
Adding Users to a Group
- You are in the User and Group Management dialog (Tools > Users and Groups...).
- Enable User Management is activated.
- Click Groups.
- All available groups are displayed. By default, you have an Administrators group. To manage access rights for user groups, see Managing Access Rights for User Groups.

- Select the group you want to add a user to, e.g. Administrators.
- Click
 .
. - The group properties dialog opens. Under Data > Members, all the members of the group are displayed.
- In the Members list, click .
- The Select User dialog opens.
- Select the user you want to add to the group and click OK.
- Click OK to close the properties dialog of the group.
- You have successfully added a user to the group.
Managing Access Rights for User Groups
You can restrict the access for user groups to certain functionalities of the software. If you use ZEN Data Storage, you can also assign privileges to user groups, see Managing Group Privileges.
- You are in the User and Group Management dialog (Tools > Users and Groups...).
- Enable User Management is activated.
- Open the Groups tab.
- All available groups are displayed.
- Select the group you want to manage access rights for.
- Click .
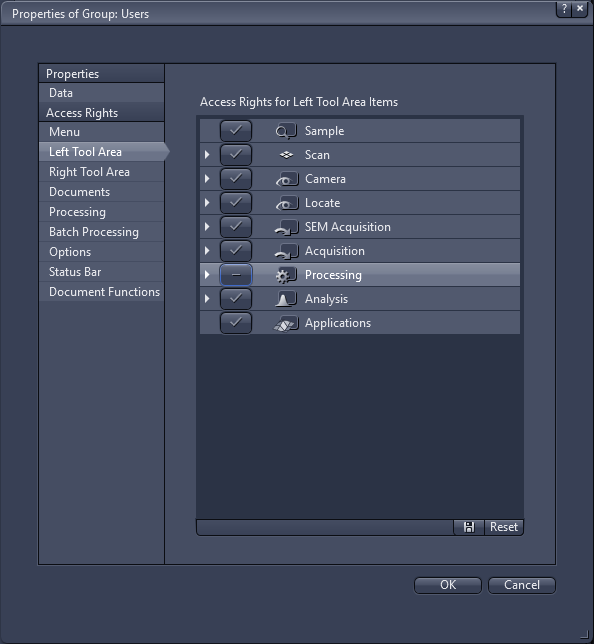
- The Group Properties dialog opens. In the left column, under Access Rights, all areas for which you can configure access rights (e.g. Menu, Processing) are displayed.
- Under Access Rights, select the area where you want to restrict access rights, e.g. Left Tool Area.
- A list of elements is displayed for which you can restrict the access.
- Click on the Check mark button in front of the respective entry.
- The button changes to a Minus. In the example the selected group is denied the access right for the Processing tab in the Left Tool Area:
- Click OK to close the dialog.
- Restart the software for the changes to be effective.
- You have successfully changed access rights for a user group.
Managing Group Privileges
If you use ZEN with ZEN Data Storage, privileges are assigned to user groups. They specify what actions members of the group can perform in the software.
The software contains various pre-defined roles, each with different sets of privileges. Typically, the software contains one user group for each role. However, you can create any number of user groups with arbitrary privileges.
- You are logged in as an administrator.
- Enable User Management is activated.
- Got to Tools > Users and Groups.
- Click on Groups.
- Select the desired user group and click on .
- Click on Privileges.
- The privileges for the ZEN Data Storage groups are displayed. Each privilege is displayed with its Name, a Description, and the Application Name. Here you can see which privilege is designated for groups in ZEN, ZEN core, or the ZEN Storage Processing Server. If the field Application Name is empty, the respective privilege is generally available.
- Select the privileges for the user group.
- You can click on one of the pre-defined Privilege sets or activate individual checkboxes to create a custom set of privileges.
- Click on OK.
- You have now set/changed the privileges for this group.
Setting Up the Login with Windows Credentials (Active Directory)
You have the possibility to configure your user management to allow to log in with Windows user and password.
Active Directory with ZEN Data Storage
If you are using Active Directory login with ZEN Data Storage, some special points need to be observed:
- During the installation of ZEN Data Storage, on the Settings tab of the installer, you have set the parameter Enable Active Directory to True. For more information, also refer to the installation guide for ZEN Data Storage.
- The ZEN Data Storage server must be part of the same Windows domain from where the software tries to login with its Windows credentials.
- ZEN is open with active user management, and you are signed in as administrator.
- Go to Tools > Users and Groups.
- The User and Group Management dialog opens.
- Click Groups.
- The tab displays all currently configured user groups.
- Click .
- The New Group dialog opens.
- For Type, select Active Directory.
- For Name, click
 .
. - The Select Group dialog opens.
- The fields for object type and location are filled with a default. To change them, click Object Types or Locations to open another dialog to select the respective Object Types or Locations.
- In the text field below, enter the name of the group you want to select. If you are not sure if your name is correct, click Check Names to open a dialog and select the suitable entry. For information on looking up the groups your own account belongs to, refer to the installation guide.
- Click OK.
- The name is displayed in the New Group dialog.
- Enter a Description for the group. This step is optional.
- Click OK to close the New Group dialog.
- The respective Active Directory is added to the groups.
- Click OK to close the User and Group Management dialog.
- You have configured an Active Directory group. You can now log into ZEN with your Windows credentials. An additional login button with the current Windows account (USERNAME@DOMAIN) is displayed on the login screen if at least one Active Directory group is configured. You can use this default entry but also edit the USERNAME@DOMAIN field to log in as another user than the current Windows account.
See also
Options
The options apply to all users, regardless of the user groups to which the user is assigned.
|
Parameter |
Description |
|
|---|---|---|
|
Check the following rules for a password |
Here you can specify certain rules or criteria for a password that is created. If the checkbox is activated, the rules must be fulfilled when a new password is created. The following rules can be adjusted: |
|
|
– |
Min. number of lower case characters |
Sets the minimal number of lower case letters a password must have. For example, if you set 2, the password must contain at least two lower case characters, like e and f. |
|
– |
Min. number of upper case characters |
Sets the minimal number of upper case letters a password must have. For example, if you set 2, the password must contain at least two upper case characters, like C and G. |
|
– |
Min. number of digit characters |
Sets the minimal number of digits a password must have. For example, if you set 3, the password must contain at least three digits from 0 - 9, like 5, 6 and 7. |
|
– |
Min. number of special characters |
Sets the minimal number of special characters a password must have. For example, if you set 1, the password must contain at least one special character, like &. |
|
– |
Minimum length |
Sets the minimal length a password must have. For example, if you set 9, the password must contain at least nine characters (any from above). |
|
Do not allow user name as password |
If activated, it is not allowed to use an existing user name as password for the software. |
|
|
Disable the reuse of last used passwords |
Activated: Disables the reuse of a specified number of last passwords. |
|
|
– |
Number |
Sets the number of passwords which cannot be reused after each other. For example, if you enter the number 3, you have to assign 3 different passwords one after another before you can use (reuse) an old password. |
|
Disable the use of common passwords |
If activated, you can create and edit a list which contains passwords which you can lock for usage. |
|
|
– |
Edit |
Opens an editor to edit the list of common passwords. For example, if you add the entry "123456789Password" this password cannot be assigned from a user. |
|
Force users to change password after period of time |
Activated: The user must change his password after the specified period of time elapses. Deactivated: The password never expires. |
|
|
– |
Days before expiry |
Specifies the number of days after which the password expires. |
|
Lock user after wrong password entries |
Activated: Locks the user after a number of wrong password entries. |
|
|
– |
Maximum number of wrong entries |
Sets the number of attempts the user has if he enters a wrong password. For example, if you enter 3, the user can enter a wrong password three times before his user account is locked. |
|
Lock screen after certain time span |
Activated: After a period of inactivity, the screen is locked and the user must enter his/her password to continue working. Deactivated: The password never expires. |
|
|
– |
Minutes until screen lock |
Specifies the time span after which the screen is locked. |
|
Enable Auto-Login |
Activated: No password is required. The user is logged in automatically based on the Windows username. Deactivated: Each user has to log in with their own password. |
|
|
Export/Import user database |
Not available for ZEN Data Storage. |
|
|
– |
Export... |
Specify the location on the file system where the database should be exported. |
|
– |
Import... |
Select the database location on the file system. |
Looking Up Active Directory Groups
If you want to set up the user management with Active Directory so that you can log in with your Windows credentials, it is useful to know the Active Directory groups to which your account belongs.
- In the Windows search, enter cmd.
- Search results are displayed.
- Click the entry for Command Prompt.
- The command prompt window opens.
- Enter net user username /domain with your username in the window and press Enter, e.g. net user MyUserName /domain.
- Information about your user account is displayed.
- You can now look for the information Local Group Memberships and Global Group Memberships to find the Active Directory groups you are a part of.