Guided Acquisition
This module enables you to create an automated workflow to acquire overview images, detect relevant objects with an image analysis and re-image these positions, using another experiment. Additionally, you can set up the Guided Acquisition to automatically repeat the detailed scan or the entire workflow to observe changes over time, such as the growth of organoids or embryos.
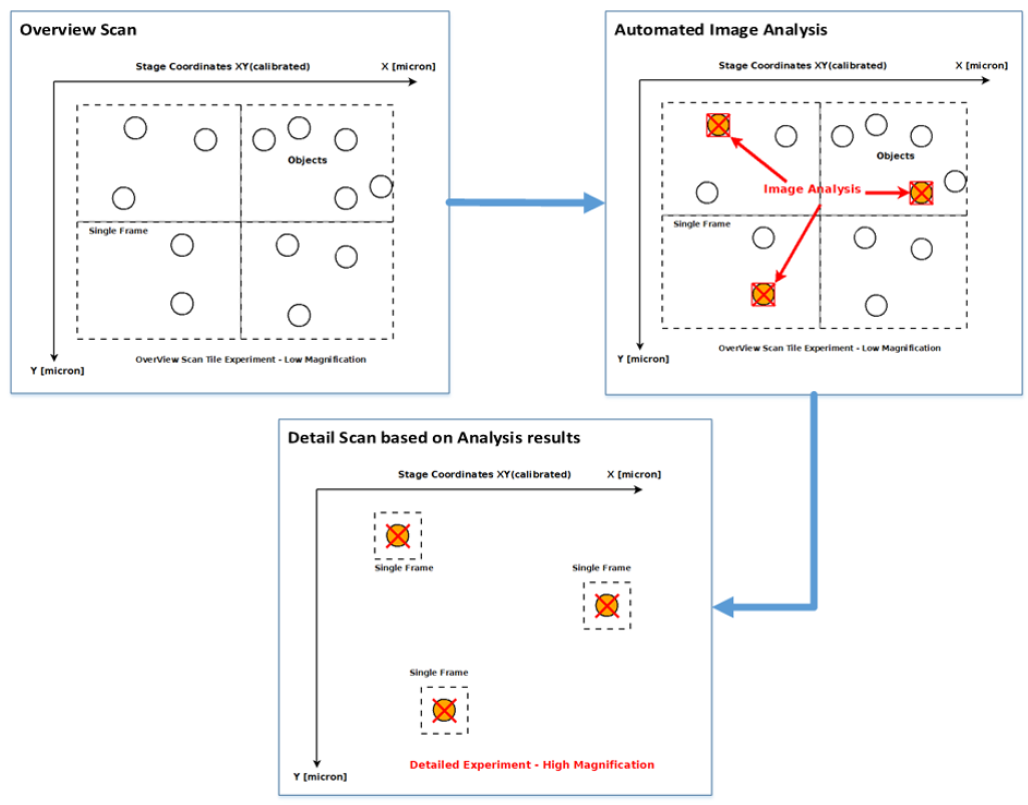
Guided Acquisition Workflow:
- Scan or inspect a large area (or over a long period of time).
- Perform an analysis to detect interesting objects.
- Acquire detailed images for every detected object.
A possible application is to detect rare events, for example to find transfected cells. For example, the sample contains many cells that are stained with a blue dye, but only a few are additionally expressing GFP. Guided Acquisition allows you to find these cells and run another, for example high-magnification, experiment on these positions.
After performing a (low-magnification) overview scan, the image analysis detects all cells and determines which of them are expressing GFP, i.e. show a certain intensity in the GFP channel. Then the microscope revisits all GFP-expressing cells and performs a second acquisition there, for example with higher magnification, a z-stack, etc. The analysis results are automatically saved to a folder.
Preliminary Work to Guided Acquisition
For a successful Guided Acquisition experiment, you need to prepare an overview and a detailed experiment as well as an image analysis setting. If you want to process your overview image before it is analyzed, you also need a suitable setting for each processing step or function you want to execute.
Overview scan
You have defined the experiment for the overview scan. Typically, the overview scan is using a lower magnification in combination with a tile experiment.
Processing setting(s)
You have defined a suitable setting for each processing step or function you want to execute. For more information, see General Settings.
Note that if you want to use Shading Correction with a reference image, you have to define your setting in Batch mode!
Image analysis setting
You have defined a suitable image analysis setting, see Creating a New Image Analysis Setting.
Detailed scan
You can perform for example the following experiments:
- simple Z-stacks with a high-NA objective lens
- Multi-Channel Z-stacks using an optical sectioning method like SD, Apotome or Airyscan
- Tile experiments
Note: If you have activated Auto-Distribute for New Tile Regions for support point distribution in the Tiles tool, this is saved in the experiment and used for Guided Acquisition as well. - Time Series
Note that for detailed experiments that are defined as a time series, a time series for each detected object is performed before moving to the next detected object. In order to create a time series which acquires the first time point for all detected objects before starting the acquisition for the second time point, use the Repeat Detailed Scan option.
Parcentricity
If you use different detectors for the overview and the detailed scan, it might be necessary to correct for the shift between both detectors (to ensure parcentricity). For this you have to take an image at the exact same position with both cameras and then determine the offset between the two (to ensure parcentricity). The reference to calculate this offset is the image taken with the camera for the overview experiment. You can then enter the values for the shift in X and Y in the guided acquisition setup.
Focus strategies
You have several options, to perform a focus strategy.
Detailed scan and overview scan can be defined with their own focus strategy using Focus Surface and/or Software Autofocus.
During the Guided Acquisition experiment, you can define additional focusing steps. They are independent from the focus strategy defined on the Acquisition tab, see Focus Strategy Tool.
For more information on Guided Acquisition, see Performing a Guided Acquisition.
Performing a Guided Acquisition
Objective Range
When positions are defined near the border of the stage, areas which are found in the overview scan might not be reached with the higher magnification objective of the detailed scan.
- Define the overview scan only in regions which can be reached with the objective used in the detailed scan.
Auto Immersion
If you set up your Guided Acquisition experiment using an immersion objective and user input would be necessary between overview and detailed experiments, a dialog is displayed directly after clicking Start. With this dialog you can control if the immersion is created when changing the objective for the scan. The experiment runs uninterrupted afterwards.
- You have calibrated the XY stage.
- You have defined suitable experiments for overview and detailed scans, a suitable setting for each processing step or function you want to execute, and a suitable image analysis setting using the Image Analysis Wizard. For more information, see Preliminary Work to Guided Acquisition.
- On the Applications tab, open the Guided Acquisition tool.
- The parameters are displayed.
- Create a setting to save your experiment setup, see Using Guided Acquisition Settings.
- You have created a setting for your entire workflow.
- In the Overview Scan section, select the experiment you want to use for creating the overview image, the objective and (if available) the after-magnification lens to be used. Note that per default, objective and after-magnification are not stored as part of an experiment. If you have selected an experiment with multiple scenes or wells, you also have to select in which order the individual scenes should be acquired and processed.
- Your overview scan is set up.
- If your system is equipped with Definite Focus, the Find Surface before Overview Experiment and SW Autofocus before Overview Experiment checkboxes are visible. Activate the checkbox to perform an additional focusing step before the overview experiment.
- The focus action is defined.
- If you want to process your overview image before it is analyzed, click Add Processing Method.
- A processing section is added.
- Select a Method for processing and a corresponding Setting.
- The respective processing is set up.
- In the Image Analysis section, select a suitable setting to analyze the overview scan and detect the objects of interest.
- If your setting contains more than one class for analysis, the Class dropdown is displayed.
- Select the Class from the image analysis setting with multiple classes, which segmented regions should be imaged (e.g. with higher resolution) in the detailed experiment.
- If you want the detailed scans to stop after a particular amount of objects, activate Add Stop Criterion for Detailed Scans.
- Additional options to define an automatic stop criterion for detailed scans are displayed.
- Select the measurement feature that should be used to sort the objects detected by the image analysis and set the order for sorting the results. The drop down list displays all suitable measurement features as defined in selected the image analysis setting. Additionally, enter the maximum number of objects that should be scanned by the detailed experiment and select if it is the overall number of objects or the number of objects per well.
- You have set up a stop criterion for the detailed experiment.
- In the Detailed Experiment section, select the experiment for the detailed scan, the objective and, if available, the after-magnification lens to be used. Note that as default objective and after-magnification are not stored as part of an experiment.
- The detailed experiment is set up.
- If your system is equipped with Definite Focus, the checkbox Find Surface before First Detailed Experiment is available. Activate this checkbox to use the Definite Focus to find z-position of the glass surface once before the detailed scans. Activate SW Autofocus before First Detailed Experiment to perform a SW autofocus once before the detailed scans. Optionally, activate Recall Focus before each Detailed Experiment to store the difference between the glass surface and the sample and use this value for each of the detailed experiments.
- The focus action for the detailed experiment is defined.
- If you want to repeat the detailed scans or the entire Guided Acquisition workflow, activate Repeat Detailed Scan or Repeat Full Guided Acquisition Workflow.
- The settings for repetition are displayed.
- Define the settings for Cycles and Interval to set up the number of iteration and the minimum time between them. If you repeat the entire workflow, use the dropdown on the top to select which action should be performed if no objects are detected by the analysis in the first iteration.
- You have set up a repeated execution of the entire Guided Acquisition workflow or the detailed scan.
- Define the folder where you want to store the experiment data.
- The output folder is defined.
- Click Start.
- An overview scan is performed and a .czi image is acquired and saved to your folder.
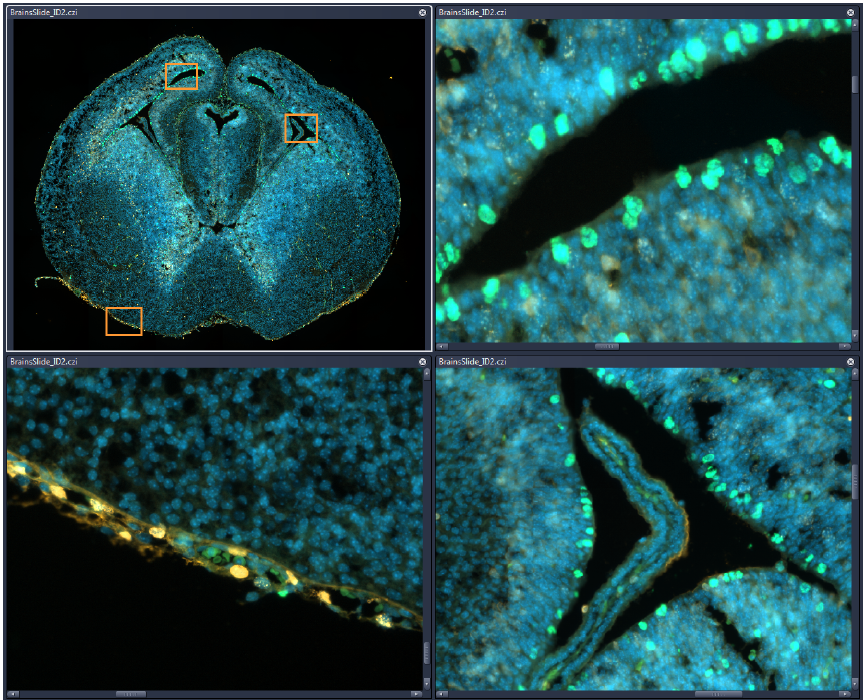
- In the example above, the image in the top left shows the overview scan and three identified objects marked with an orange box. For these positions, a detailed scan is performed with a higher magnification.
- One Overview Scan Regions.csv and one OverviewScan Region.csv are displayed. The OverviewScan Region.csv table shows the found objects with ID, Bound Center X Stage [µm] and with Y Stage [µm], Bound Width, and Bound Height [µm], as well as Image Scene Container Name and Image Index Scene.
- For each detected object a detailed scan is performed. For each object, a *.czi image is acquired and stored in your folder.
See also
Using Guided Acquisition Settings
Guided Acquisition offers you the possibility to save your whole experiment setup in a settings file. This file is saved in the folder for your Guided Acquisition experiment together with all the other settings, for example the overview and detailed experiment, the image analysis setting, and the image processing settings, if a processing step was selected.
Creating a Guided Acquisition setting
- On the Applications tab, open the Guided Acquisition tool.
- Click
 and select New.
 - Name the setting and press Enter on your keyboard or click
 .
.
- You have created a setting for Guided Acquisition.
Saving a Guided Acquisition setting
When you have set up your Guided Acquisition experiment and created a setting, you can save the set up as a setting.
- Click and select Save.
- Your experiment set up is now saved.
Importing and exporting a Guided Acquisition setting
- On the Applications tab, open the Guided Acquisition tool.
- Click and select Import or Export.
- A file browser opens.
- Select the file you want to import or the folder where you want to export the setting to.
- Click Open/Save.
- You have now imported/ exported a setting.
Deleting a Guided Acquisition setting
- On the Applications tab, open the Guided Acquisition tool.
- Select the setting that you want to delete in the drop-down list.
- Click and select Delete.
- Confirm that you want to delete the file.
- The selected setting is deleted.
See also
Guided Acquisition Tool
|
Parameter |
Description |
|
|---|---|---|
|
|
||
|
- |
New |
Creates a new Guided Acquisition setting. Enter a name for the setting. |
|
- |
Rename |
Renames the setting. |
|
- |
Save |
Saves a modified setting under the current name. An asterisk indicates the modified state. |
|
- |
Save As |
Saves the current setting under a new name. Enter a name for the setting. |
|
- |
Import |
Imports an existing setting. |
|
- |
Export |
Exports the current setting. |
|
- |
Delete |
Deletes the current setting. |
|
Repeat Full Guided Acquisition Workflow |
Activated: Displays parameters to repeat the entire workflow over time. |
|
|
Cycles |
Only visible if Repeat Full Guided Acquisition Workflow is activated. |
|
|
Interval |
Only visible if Repeat Full Guided Acquisition Workflow is activated. |
|
|
Object Detection Dropdown |
Only visible if Repeat Full Guided Acquisition Workflow is activated. |
|
|
- |
Keep Iterating if no Object Detected |
Continues to iterate even if no objects are detected. |
|
- |
Stop Guided Acquisition if no Object Detected |
Stops Guided Acquisition if no objects are detected. |
|
- |
Keep Acquiring Scenes without Analysis Findings |
Only visible if your overview experiment contains a setup with multiple scenes. |
|
- |
Exclude Scenes without Findings in Following Iterations |
Only visible if your overview experiment contains a setup with multiple scenes. |
|
- |
Exclude Wells without Findings in Following Iterations |
Only visible if your overview experiment contains a setup with multiple wells. |
|
Overview Scan |
Defines the settings for the overview scan. |
|
|
- |
Experiment |
Selects the experiment setup to acquire the overview scan. |
|
- |
Order |
Only visible if your overview experiment contains a setup with multiple scenes or wells.
|
|
- |
Objective |
Selects the appropriate objective for the overview scan (typically with a low magnification). If the objective has already been defined in the experiment, it is read only (greyed out) here. |
|
- |
Optovar |
Only visible if an optovar is available. Selects the optovar for after magnification of the overview scan. If the optovar has already been defined in the experiment, it is read only/greyed out here. |
|
- |
Find Surface before Overview Experiment |
Only visible if Definite Focus is licensed. Performs a Find Surface before the overview scan. This step is independent from and additional to any focusing strategy defined in the overview experiment. |
|
- |
SW Autofocus before Overview Experiment |
Performs a SW Autofocus before the overview scan and sets the found z-position as z-position for the overview scan. This step is independent from and additional to any focusing strategy defined in the overview experiment. |
|
- |
Initial Range |
Only available if SW Autofocus is activated. Sets the range for the software autofocus. |
|
Processing |
Displays a section for processing steps to process the overview image before it is analyzed. |
|
|
- |
Add Processing Method |
Adds a step for a new processing method. |
|
- |
Method |
Selects a processing method from a drop-down list.
|
|
- |
Setting |
Selects the setting for the processing method from the drop-down list. |
|
- |
|
Removes this entire processing step. |
|
Image Analysis |
Defines the image analysis parameters for the workflow. |
|
|
- |
Setting |
Selects the image analysis setting used to analyze the overview scan. |
|
- |
Class |
Only visible if you have selected an analysis setting where more than one class is defined. |
|
- |
Add Stop Criterion for Detailed Scans |
Activated: Displays options to define a stop criterion for the detailed experiment. |
|
- |
Select Feature |
Only visible if Add Stop Criterion for Detailed Scans is activated. |
|
- |
Select Order |
Only visible if Add Stop Criterion for Detailed Scans is activated. |
|
- |
Random Selection |
Only visible if Add Stop Criterion for Detailed Scans is activated. |
|
- |
Max. Objects |
Only visible if Add Stop Criterion for Detailed Scans is activated. |
|
Repeat Detailed Scan |
Activated: Displays parameters to repeat the detailed scan over time. |
|
|
Cycles |
Only visible if Repeat Detailed Scan is activated. |
|
|
Interval |
Only visible if Repeat Detailed Scan is activated. |
|
|
Detailed Experiment |
Defines the settings for the detailed scan. |
|
|
- |
Experiment |
Selects the experiment setup to acquire a detailed scan at the position of each object detected by the image analysis. |
|
- |
Objective |
Selects the appropriate objective for the detailed scan (typically with high magnification). If the objective has already been defined in the experiment, it is read only/greyed out here. |
|
- |
Optovar |
Only visible if an optovar is available. Selects the optovar for after magnification of the detailed scan. If the optovar has already been defined in the experiment, it is read only/greyed out here. |
|
- |
Find Surface before First Detailed Experiment |
Only visible if Definite Focus is licensed. Performs a Find Surface before the first detailed scan. This step is independent from and additional to any focusing strategy defined in the detailed experiment. |
|
- |
SW Autofocus before First Detailed Experiment |
Performs a SW Autofocus before the first detailed scan and sets the found z-position as z-position for the detailed scan. This step is independent from and additional to any focusing strategy defined in the detailed experiment. |
|
- |
Initial Range |
Only available if SW Autofocus is activated. Sets the range for the software autofocus. |
|
- |
Recall Focus before each Detailed Experiment |
Only visible if Definite Focus is licensed and if Find Surface before First Detailed Experiment is activated. Restores the saved focus position and applies it for each detailed experiment. |
|
Output Folder |
||
|
- |
Output Folder |
Determines the folder where the analysis results are saved. |
|
Open Output Folder after Execution |
Activated: Opens the output folder after Guided Acquisition is finished. |
|
|
Start |
Starts Guided Acquisition. |
|
