Intellesis Segmentation
This module enables you to use machine-learning algorithms for segmenting images using pixel-classification. It uses different feature extractors to classify pixels inside an image based on the training data and the labeling provided by the user. There are a variety of use cases because the functionality itself is "data-agnostic", meaning it can be used basically with every kind of image data.
The module has the following main functionality:
- Any user can intuitively train a machine learning model to perform image segmentation without advanced training by simply labeling what shall be segmented.
- Import of any image format readable by the software, incl. CZI, OME-TIFF, TIFF, JPG, PNG and TXM (special import required).
- Creation of pre-defined image analysis settings (*.czias) using machine learning based segmentation that can be used inside the image analysis.
- Integration of the Intellesis Segmentation processing functionality into the OAD environment.
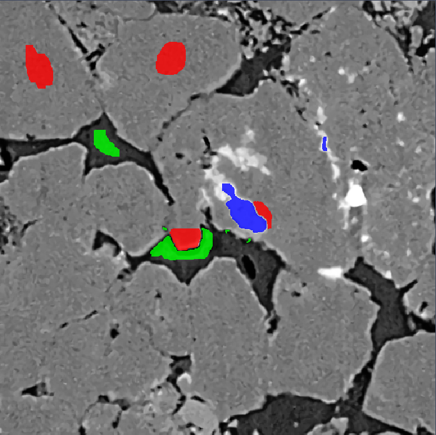
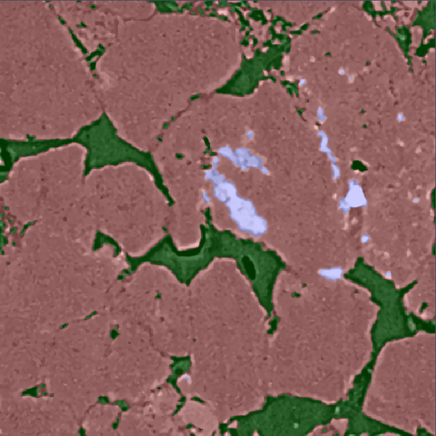
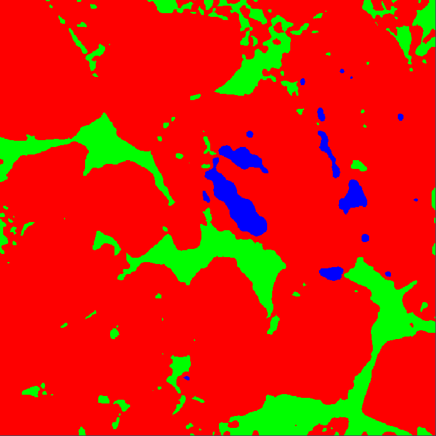
Application
Example:
XRM (X-Ray Microscopy) image from sandstone showing the main steps when working with the Intellesis Segmentation module.
|
|
|
|
|
|

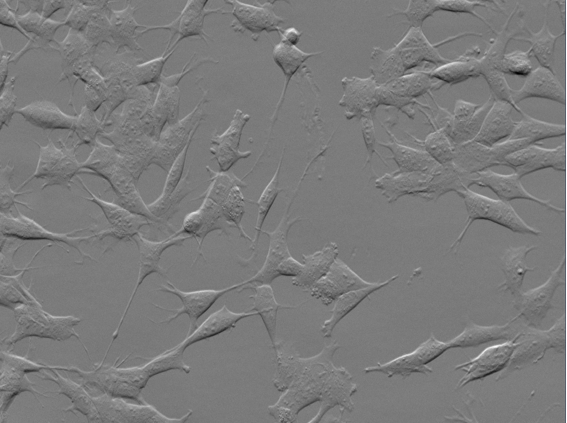
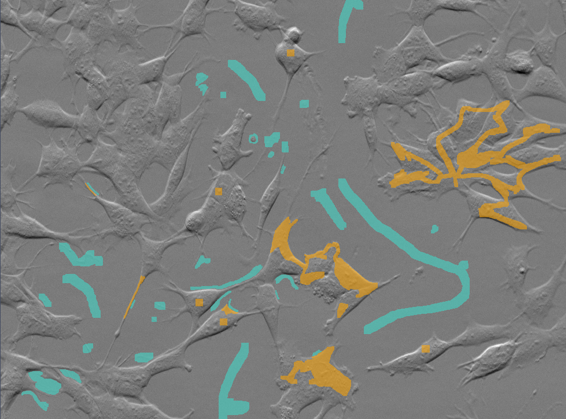
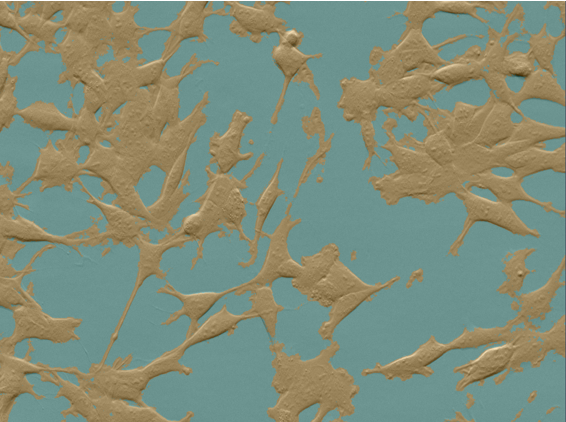
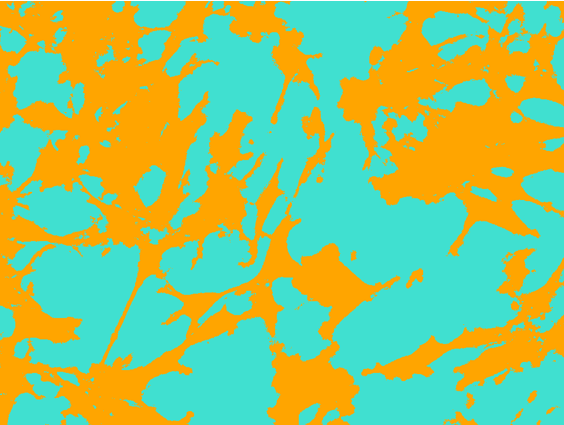
Application
Example:
Cells image with phase gradient contrast on the Celldiscoverer 7 and segmented using Intellesis Segmentation.
|
|
|
|
|
|
Note:
The training of Intellesis Segmentation models is CPU/GPU specific. A model trained on GPU only runs on a GPU machine. If a model trained on GPU is transferred to a CPU-only machine, the model has to be retrained to run on this machine.
Licensing and Functionalities of Intellesis Segmentation
Some functionality of Intellesis Segmentation is generally available in ZEN, but the full functionality requires the AI Toolkit license.
Basic functionality
The general available functionality includes:
- Importing and exporting models.
- Managing the models, including renaming and deleting.
- Creating an analysis setting from your model.
- Running a model with the Intellesis Segmentation function on the Processing tab or in OAD (if you have licensed the Developer Toolkit).
- Running a model as part of the image analysis or Bio Application segmentation step, if you have the license for the 2D Toolkit or Bio Applications Toolkit respectively.
Licensed functionality
If you have licensed this functionality and activated it under Tools > Toolkit Manager, the following additional functionality is available:
- Creating and training a new model.
- Retraining an existing model.
Fact Sheet
- Simple User Interface for Labelling and Training
- Integration into ZEN Measurement Framework
- Support for multi-dimensional datasets
- Machine-Learning Tool for Pixel Classification powered by Python
- Scikit-Learn
- Tensorflow
- Dask
- Client/Server Architecture with REST-API
- Engineered Default Feature Sets (CPU)
- 25 or 33 Features
- Neural Network (vgg19) Layers for Feature Extraction (GPU)
- 64, 128 (red. 50) or 256 (red. 70) Features for 1st, 2nd or 3rd layer
- Random Forest Classifier for Pixel Classification (CPU)
- Option to download pre-trained DNNs (Deep neural Networks) for specific sample types (subject of change)
- Post Processing: Conditional Random Field (CRF)
- IP-Functions for creating masks and confidence maps
- Integration into the OAD scripting environment (Developer Toolkit) for advanced automation
FAQ/Terminology
|
Question/Term |
Description |
|---|---|
|
Machine Learning |
The Intellesis Segmentation module uses machine learning to automatically identify objects within an image according to a pre-defined set of rules (the model). This enables any microscopy user to perform image segmentation even on complex data sets without programming experience or advanced knowledge on how to set up an image segmentation. |
|
What is a "Model" ? |
A model is a collection of rules according to which the software attributes the pixels to a class. Such a class is mutually exclusive for a given pixel, i.e. a pixel can only belong to one class. The model is the result of (repeated) labeling and training a subset of the data. After the model is trained using the labels provided by the user, it can be applied to the full data set in image processing, or it can be used to create an image analysis setting (*.czias) to be used with the 2D Toolkit. In image processing the trained model can be applied to an image or data set and perform segmentation automatically. As result you will get two images, the segmented image on the one hand and a confidence map on the other. |
|
What is a "Class" ? |
A class is a group of objects (consisting of individual pixels) with similar features. According to the selected model the pixels of the image will be attributed as belonging to a certain class, e.g. cell nuclei, inclusions in metals, etc. Every model has by default already two classes built-in, because at least two classes are needed (e.g. cells and background or steel and inclusions). More classes can be defined if necessary. |
|
What is "Labeling" ? |
Instead of using a series of complex image processing steps in order to extract the features of the image, you can simply label some objects in the image that belong to the same class. Based on this manual labeling the software will attribute the pixels of the image as belonging to a certain class. In order to refine the result, you can re-label wrongly attributed pixels to assign them to another class. |
|
What is "Training" ? |
During the training process (in the Intellesis Segmentation training user interface) you can repeatedly label structures as belonging to one class, run the training, check if the result matches your expectation and if necessary, refine the labeling in order to improve the result. The result is a trained model (a set of rules) which produce the desired result when applied to the training data. With the labeled pixels and their classes a classifier will be trained. The classifier will then try to automatically assign single pixels to classes. |
|
Training UI |
The user interface for training is the starting point of the automatic image segmentation process. Here you import and label images, and train the model which you can later use for automatic image segmentation. Within this interface you can load the training data, define the classes of objects found in your data and train the classifier to assign the objects to the correct classes. |
|
What is "Segmenting" or "Segmentation"? |
Segmentation is the process of partitioning an image into segments, where each segment consists of pixels that share certain features. This involves assigning a class label to each pixel based on its features, such as color, texture, or intensity and grouping of pixels: pixels that are classified into the same class are grouped together to form distinct segments within the image. Before you can perform segmentation, the segmentation model has to be trained. Within the Training UI you train the software by labeling specific objects or structures that belong to different classes. A pseudo-segmentation is performed each time you train the model so that you see if the feature extractor works for your image. One output of the Intellesis Segmentation processing is the fully segmented image using the trained model. The second output is the confidence map, helping you assess the reliability of the segmentation. |
|
Confidence Map |
The confidence map is one of two resulting images when you apply a trained model to an image by using the processing function Intellesis Segmentation. The (resulting) grayscale image encodes the reliability of the segmentation. Areas which can be addressed to a certain class with a high confidence will appear bright, whereas areas which have a lower confidence to belong to a certain class will appear dark. The confidence is represented by a percentage value, where 0 means "Not confident at all" (dark) and 100 "Very confident" (bright). |
|
What is a "Feature"? |
A feature is a specific property of a pixel that is calculated using a predefined set of filters and processing functions. This process results in a "Feature Vector" for each pixel, which encapsulates various characteristics of the pixel. |
|
What is a "Feature Extractor"? |
A feature extractor is a pre-defined set of processing functions that is used to create the feature vector for every pixel. A specific layer of a pre-trained neuronal network can be used as feature extractor as well. |
|
Prediction |
When the model that was trained on example data is applied to a new unlabeled data set the result is called a prediction. |
|
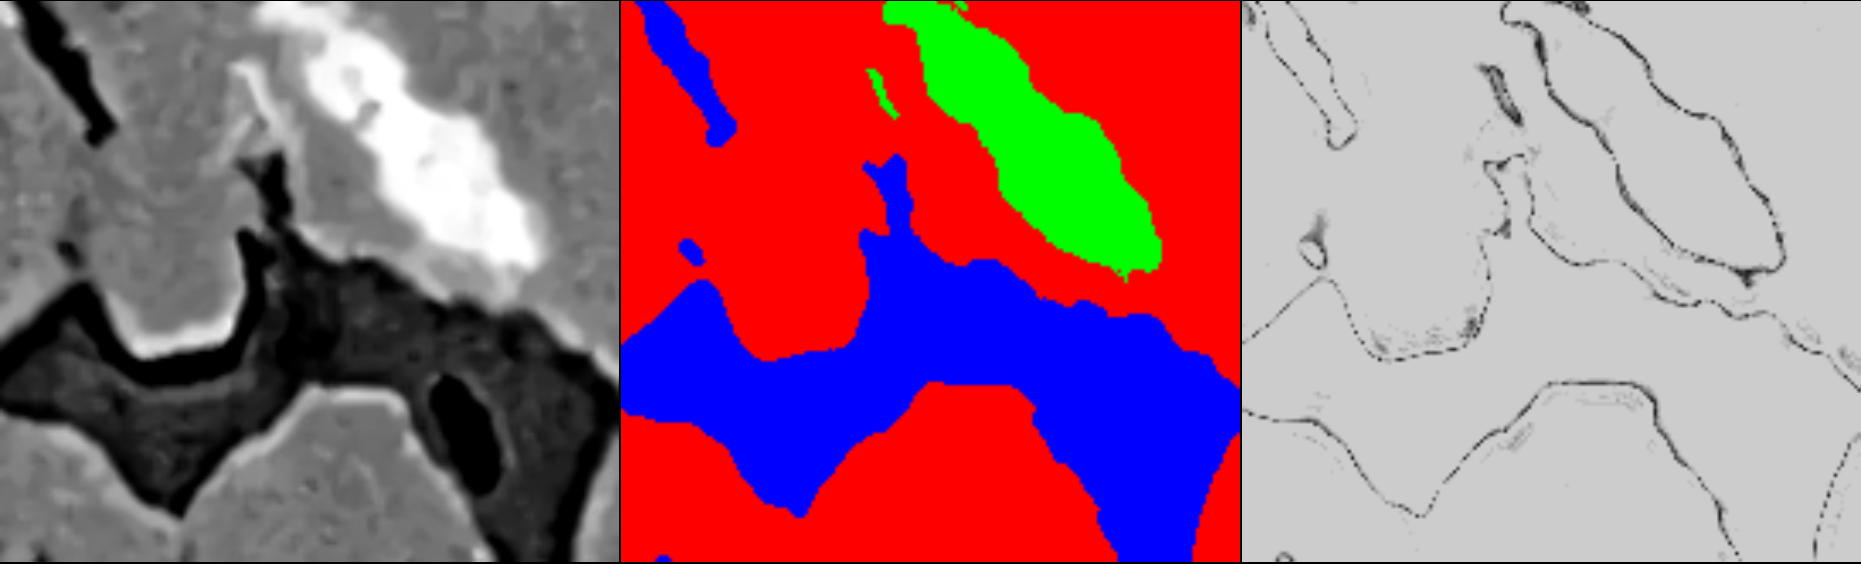
Multi-Channel Images |
The Intellesis Segmentation module supports multi-channel data sets. It is important to understand that in case of multi-channel images every pixel can still only belong to one class, i. e. the classes are mutually exclusive. The additional information of having more than one intensity value per pixel (e.g. one for every channel) is also used for classification. Example: If you have overlapping regions A and B in the image you want to classify, consider labeling three independent classes:
|
Operating Concept Intellesis Segmentation
The operating concept can generally be split into three parts:
|
|
The Training User Interface, which is accessed via the Intellesis Segmentation tool on Analysis tab. Within the training user interface you can label the images to be used as input for training a specific model, see Training User Interface Intellesis Segmentation. |
|
|
The image processing function Intellesis Segmentation, which can be used to segment images resulting in binary masks. Those masks can be used in subsequent workflows, such as 2D or 3D analysis. The models can also be used for image processing, see Segmenting an Image Using the Intellesis Segmentation Image Processing Function. |
|
|
The automatic creation of Image Analysis settings (*.czias), which allows you to use a trained model for automated segmentation and measurement of image data in the Image Analysis Wizard. To familiarize with the basic steps, see Performing an Image Analysis Using an Intellesis Segmentation Model. |


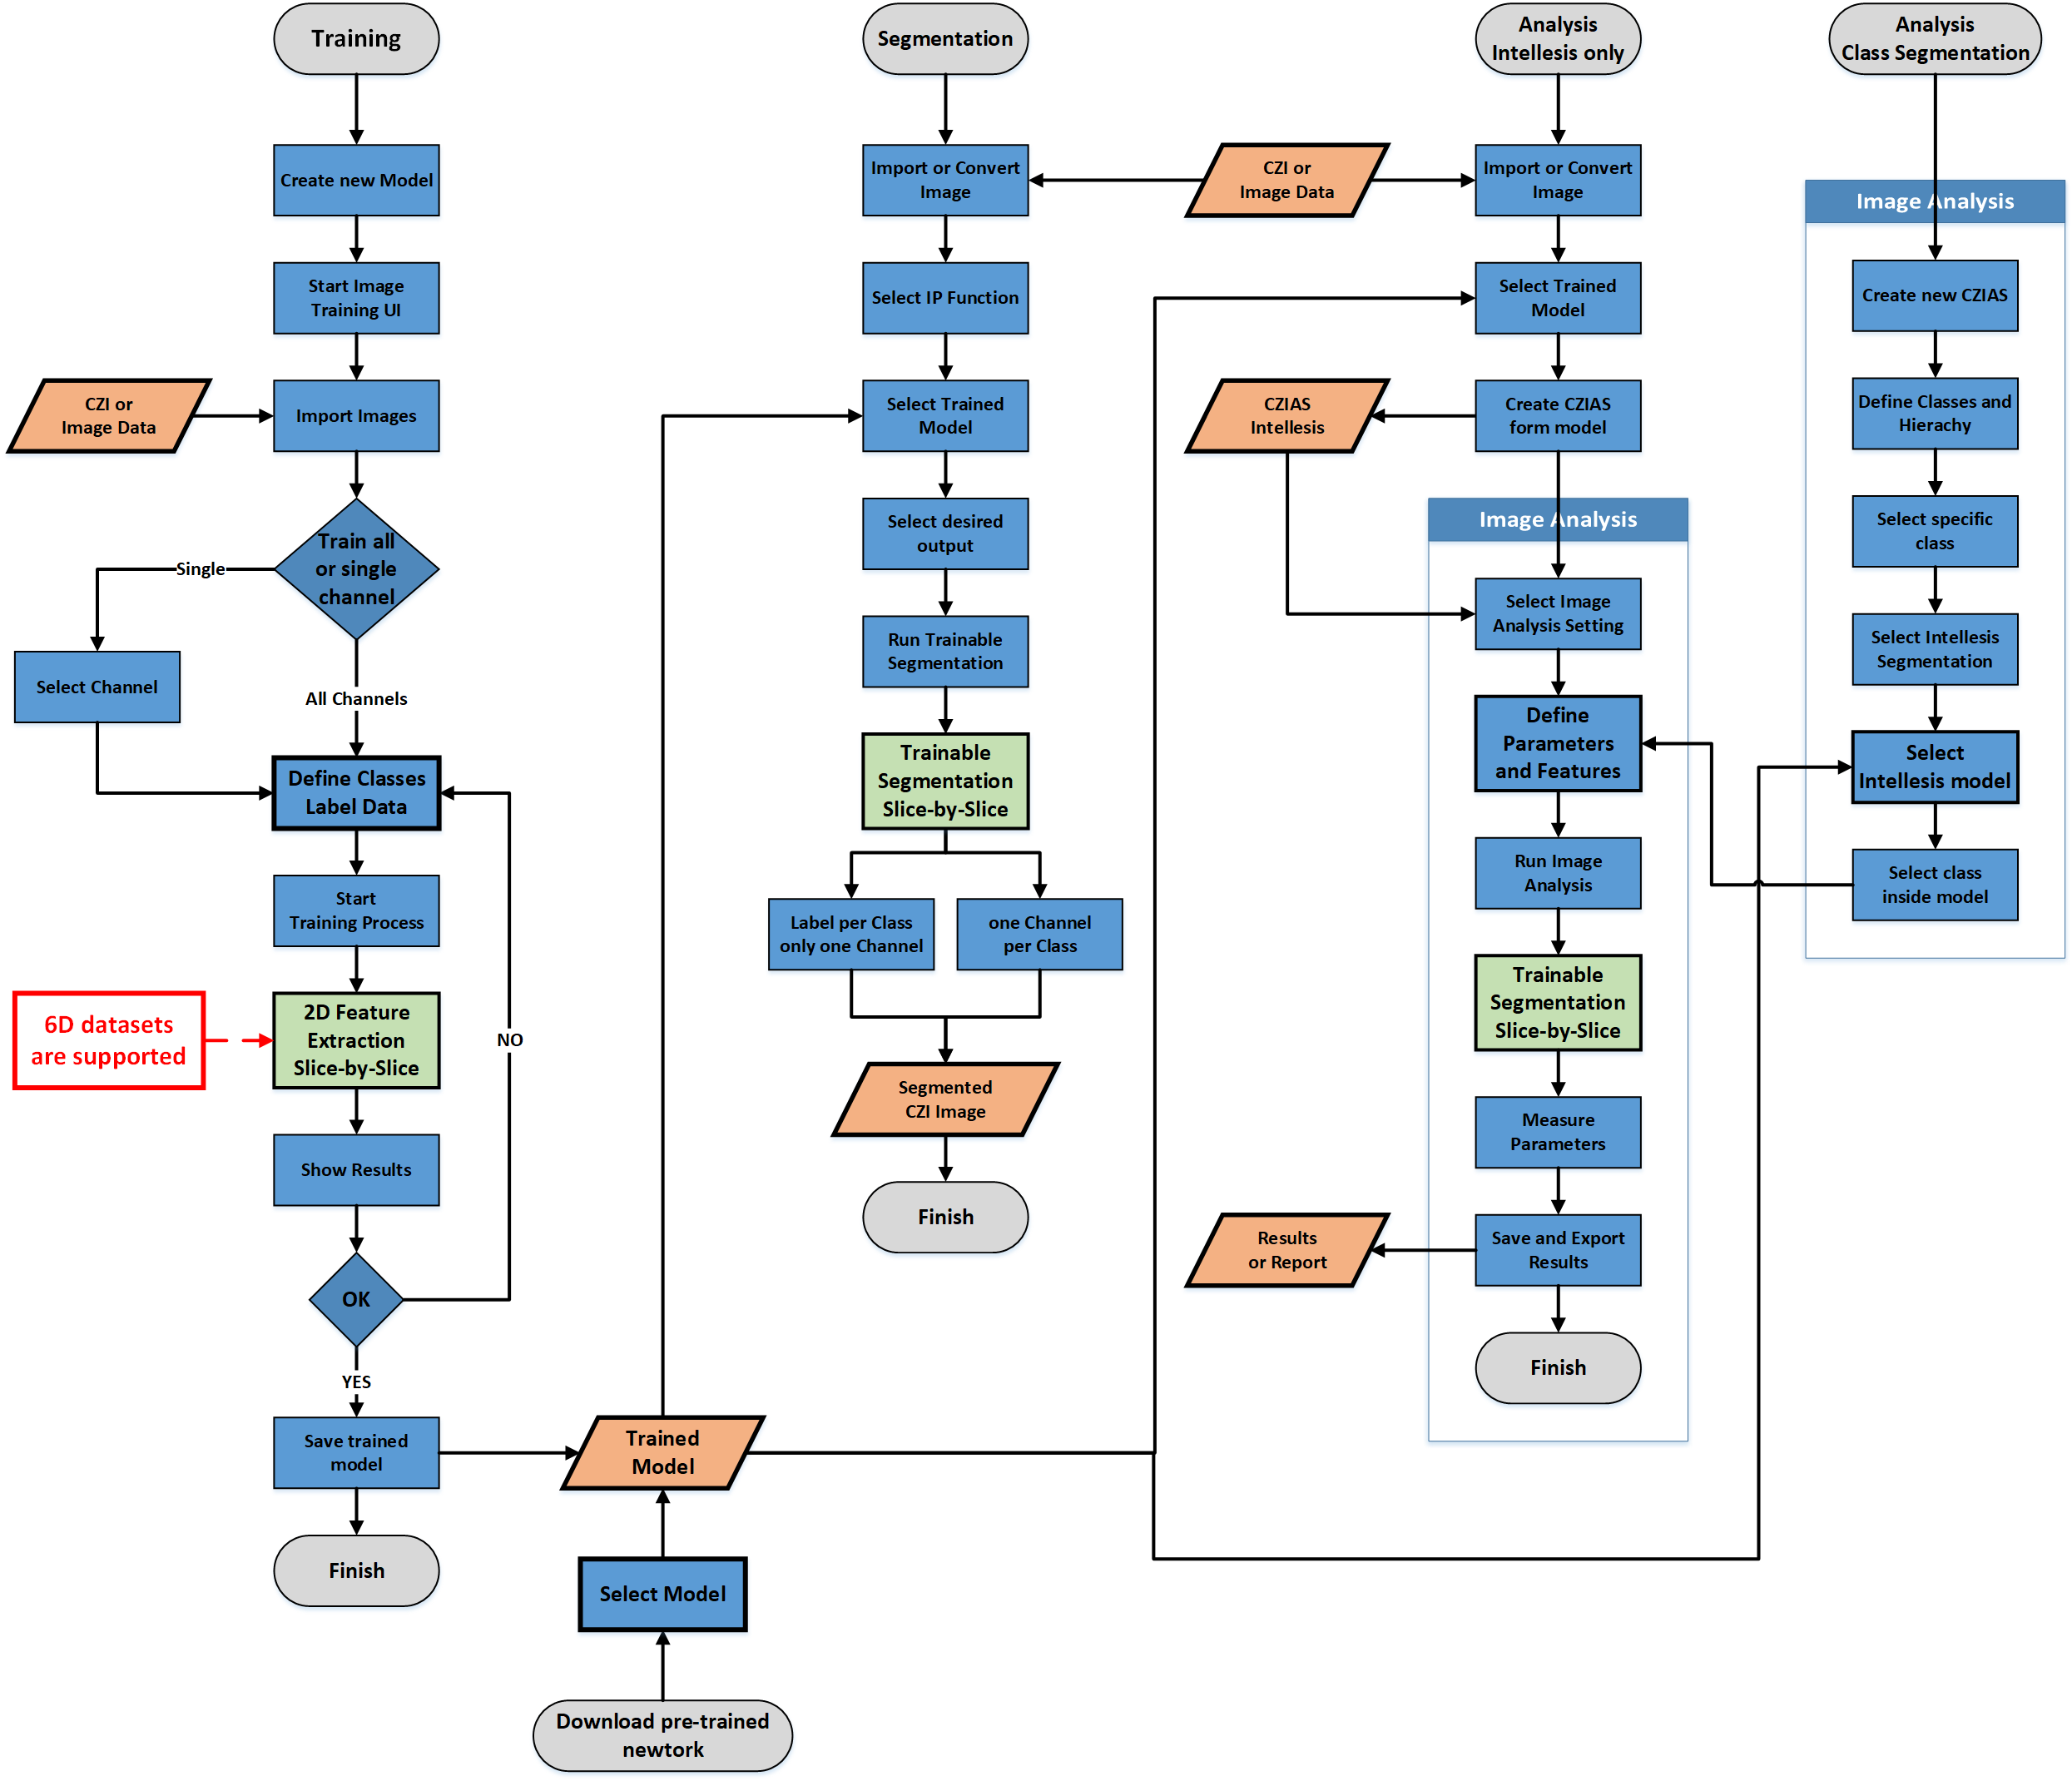
Workflow Overview for Intellesis Segmentation
Intellesis Segmentation offers three main workflows. The general workflows and the basic steps involved are shown inside the diagram.
- Labeling and training your images -> results in a Trained Model.
- Using the trained model to segment images -> results in Binary Masks.
- Using the trained model for image analysis -> results in classified pixels for subsequent segmentation and measurements of objects.
Editing Classes
- To add a new class to the Classes list, click Add Class.
- The classes have an arbitrary color by default.
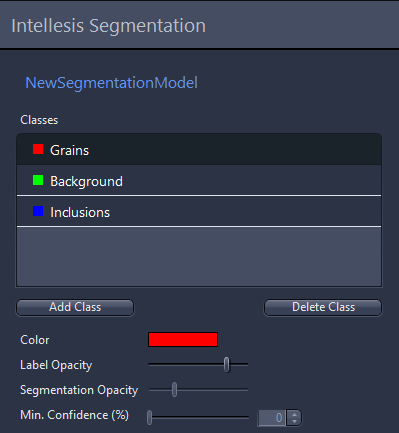
- To change the color of a class, select the class and click on the colored rectangle next to Color.
- You see the Color Selection dialog.
- Select a new color from the list.
- To change the opacity of the labels within the image, adjust the Opacity slider.
- To rename a class double click on the class entry and enter a new name. Press Enter or click the Save icon to save the new name. Note that you must not use the name Root for one of your classes as this a reserved keyword from the image analysis.
- To delete the selected class, click Delete Class.
Importing Labels from Binary Mask
This class-specific function allows you to import binary images from an external source as labels for the currently selected class. This is useful when the ground truth for a specific image is already available or when you wish to use a binary image obtained through a different modality as annotation for the training.
Be aware that this function overwrites existing labels for this class and that this functionality can possibly create a huge number of labels that might lead to memory issues depending on the system configuration and the selected feature extractor.
- The label image to be imported has exactly the same dimension in XY as the currently selected training image.
- You have opened the user interface for training, see Creating and Training an Intellesis Segmentation Model.
- Right-click a class and select Import Labels from Binary Mask.
- The explorer opens.
- Navigate to the label image you want to import and click Open.
- The imported image is displayed in the Image view. The displayed labels have the color of the selected class and fit exactly with the class of the loaded image.
Converting Segmentations to Labels
With this function you can convert the result of a segmentation in the Intellesis trainings interface directly to labels and thereby increase the number of labels for the next training iteration.
- You have opened the user interface for training, see Creating and Training an Intellesis Segmentation Model.
- You have performed a segmentation.
- Right-click a class and select Segmentation to Labels.
- The segmentations are converted to labels and are visible in the Labels channel. These can be further refined the brush and delete tool.
Using Pretrained Deep Learning Networks for Image Segmentation
In ZEN you can use pre-trained deep learning models for image segmentation. You can use models provided by Zeiss or load your own models. These models can be imported in ZEN via the Intellesis Segmentation tool, see Importing an Intellesis Segmentation Model.
After the import the model can be used for the following workflows:
- Segment images using the respective image processing function, see also Segmenting an Image Using the Intellesis Segmentation Image Processing Function.
- Create an image analysis setting based on the network (no hierarchy), see also Performing an Image Analysis Using an Intellesis Segmentation Model.
- segment a specific class in the Automatic Segmentation step of the Image Analysis (only for models trained on single-channel images).
Using networks provided by ZEISS
Zeiss provides some pre-trained networks for you to use (subject to change without notice). These networks are available for download on the ZEISS GitHub page for Open Application Development (OAD) and can be found inside the Machine-Learning section.
Note: These networks are copyright protected!
Condition of Use
These pre-trained networks were trained with "best-effort" on the available training data and is provided "as is" without warranty of any kind. The licensor assumes no responsibility for the functionality and fault-free condition of the pre-trained network under conditions which are not in the described scope. Be aware that no pre-trained network will perform equally good on any sample, especially not on samples it was not trained for. Therefore, use such pre-trained networks at your own risk and it is up to the user to evaluate and decide if the obtained segmentation results are valid for the images currently segmented using such a network. By downloading you agree to the above terms.
Detailed Information about pre-trained DNNs
Such networks are specific for the application they have been trained for. Detailed information can be provided on demand.
Using your own networks
You can also train and use your own networks. To be able to use your own networks in ZEN, your networks have to fulfill certain specifications detailed in the ANN Model Specification.
Additional information about ZEISS machine learning, including an example of how to train a model and convert it into a czmodel can be found in this Readme on GitHub. It also explains the usage of the PyPi package which is free to use for everybody.
Segmenting an Image Using the Intellesis Segmentation Image Processing Function
- You have trained an Intellesis segmentation model.
- You have opened the image which you want to segment under Images & Documents.
- On the Processing tab, select the Intellesis Segmentation function.
- Open the Method Parameters and select the trained model from the Model list. Ensure the model was trained on images with similar features; otherwise, segmentation may be ineffective. Additionally, the pixel types of the image and model must match, or segmentation cannot be performed.
- Select the desired Output Format.
If you select Multi-Channel, the output will be a multi-channel image, with each class defined in the trained model represented in its own channel. This format can be easily viewed in the ZEN 3D view and seamlessly combined with the original image data.
If you select Labels, the output will be a single-channel image, where pixels corresponding to different classes are labeled with distinct colors and represented by unique pixel values. - Under Input Parameters select the image which you want to segment, and click Apply.
- The automatic image segmentation using the Intellesis segmentation model is performed.
- When the segmentation is finished, you get two resulting images depending on the output format:
- the multi-channel or labels image and
- the confidence map. - You can also use the image processing function in Batch mode similar to all the other functions to segment several images using different models at once in one run.
See also
Performing an Image Analysis Using an Intellesis Segmentation Model
Once you have trained a model for segmentation, you can also use it in the Image Analysis for further analysis. To use the trained model, you must first create a new image analysis (IA) setting (*.CZIAS format) first. To use the trained model there are two options:
- Create a new image analysis setting from the Intellesis segmentation model. This is the only option for Intellesis segmentation models trained on a multi-channel image.
- Use an Intellesis segmentation model in the Automatic Segmentation step of an image analysis setting, see Automatic Segmentation. This option is only possible for models trained on single-channel images, but allows you to create image analysis settings with a complex hierarchy.
- You are in the Intellesis Segmentation tool.
- Select the trained model which you want to use to create an analysis setting, click
 , and select Create Analysis Setting.
 - The dialog for saving the setting opens. The setting will be saved as *.czias file in the ZEN default folder for image analysis settings (usually under User/Documents/Carl Zeiss/ZEN/Documents/Image Analysis Settings).
- Click Save.
- The file is saved.
- Now change to the Image Analysis tool and select the setting from the dropdown list. Note that the setting is only available in the dropdown list when you have used the default folder for saving. Otherwise the setting must be loaded from the file system (specific location) via the Import option.
- The image analysis setting is loaded with the classes defined in the Intellesis segmentation model.
- You can now continue with setting up an image analysis. For more information, see Image Analysis Wizard.
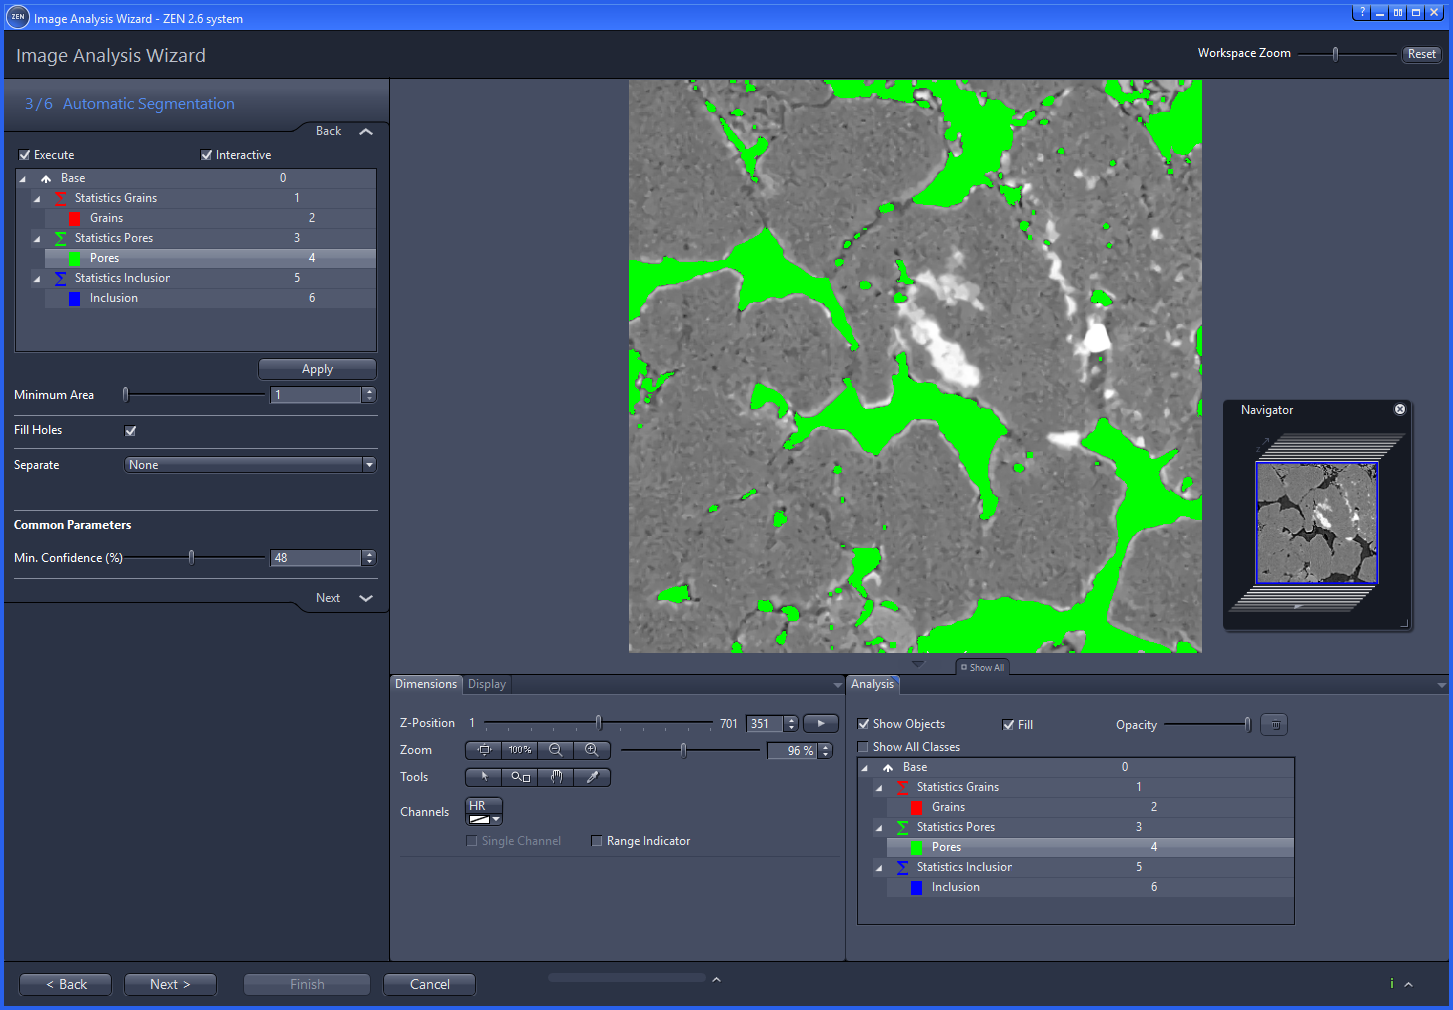
- The image displays a sandstone dataset segmented using Intellesis Segmentation inside the Image Analysis Wizard and showing the actual segmentation step. Instead of conventional thresholds, the Intellesis segmentation model is used to segment the image.
- With the Min. Confidence (%) parameter, it is possible to exclude pixels where the model exhibits a low confidence level, applicable to all classes.
- The binary functions Fill Holes and Separate are applied solely to the binary masks produced by the Intellesis segmentation step, making them independent of the actual segmentation process.
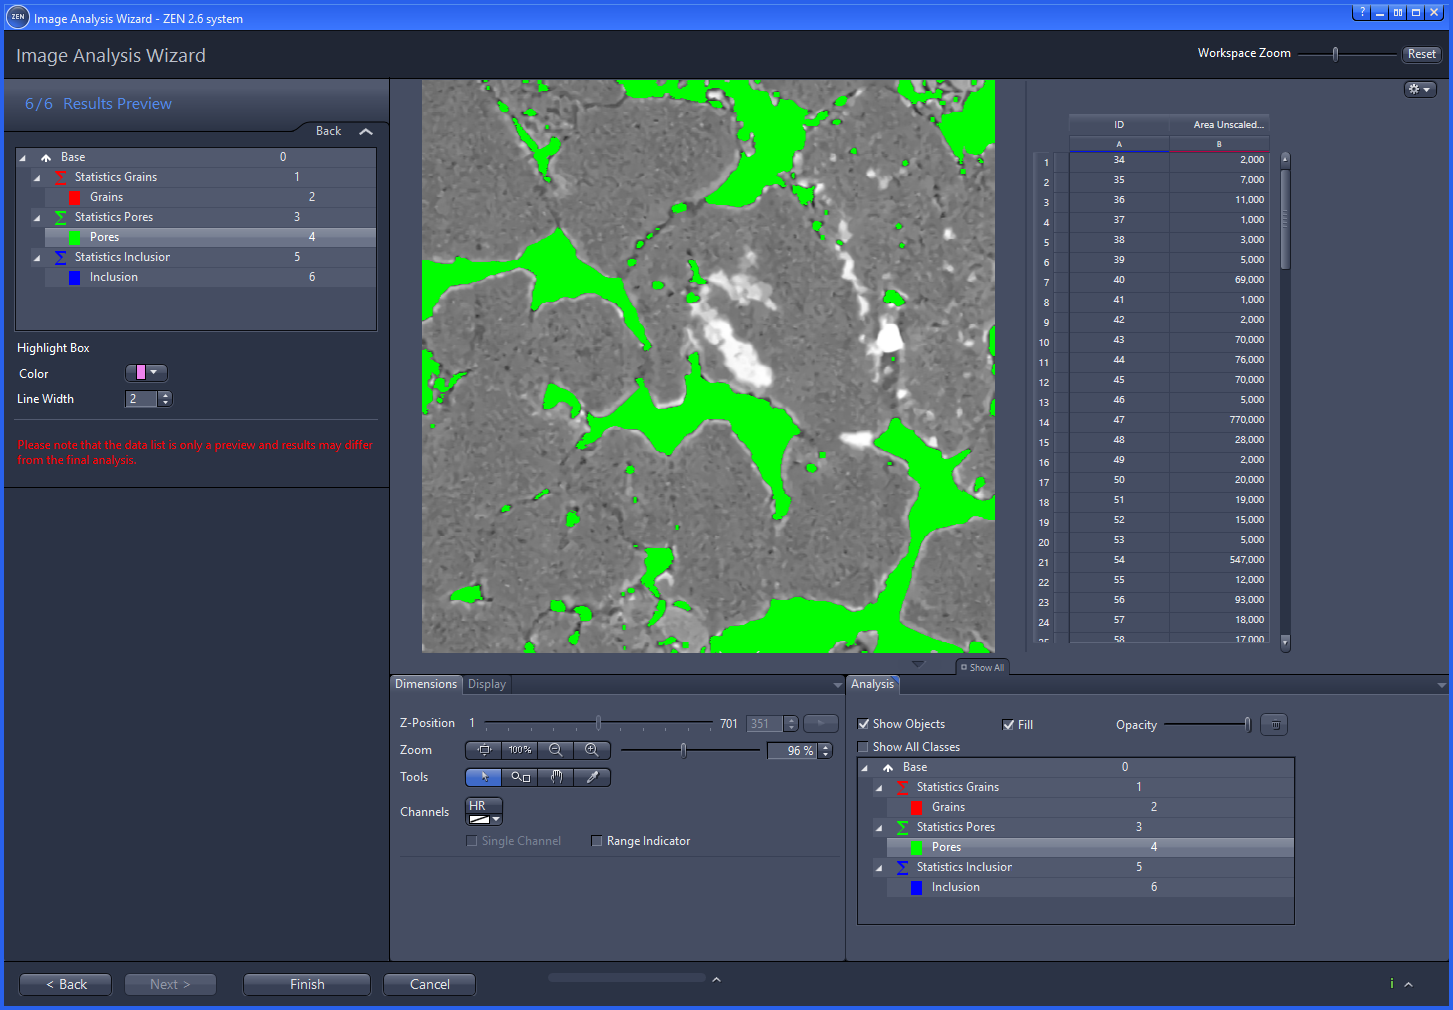
- Sandstone Dataset segmented using Intellesis Segmentation in the Image Analysis Wizard showing the measurement results for one particular class (shown in green).
See also
Changing the Tile Border Size for Deep Learning Networks
Undo Border Size Changes
There is no way to undo the change of the border size unless you remember the original value and change it back with the same workflow described here.
- You have imported a deep learning network, see Importing an Intellesis Segmentation Model.
- On the Analysis tab, in the Intellesis Segmentation tool, select the network as your Model.
- Click and select Change Border Size.
- The Change Border Size dialog opens.
- Change the Border Size to fit your needs. Note while increasing the border size reduces segmentation artifacts in the output, it also decreases the tiling speed.
- Click OK.
- You have changed the border size for tiling. If there are still tiling artifacts with the maximum border size, consider retraining the model with larger tiles.
See also
Using Intellesis Segmentation Models in OAD
Intellesis segmentation models can be applied within the Open Application Development (OAD) environment. Methods to list, import, and execute semantic segmentation models trained with Intellesis Segmentation or on arivis Cloud are available and can be used as part of automated OAD workflows.
|
Method/Command |
Description |
|---|---|
|
Zen.Processing.Segmentation.TrainableSegmentation |
Function to segment an image using a trained model. |
|
ZenImage - Defines the input image to be segmented. |
|
ModelName - Defines the name of the model. |
|
Function to segment an image using a trained model. |
|
Zen.Processing.Segmentation.TrainableSegmentationWithConfidenceMap |
Addresses the Segmentation function including a confidence map. |
|
ZenImage - Defines the input image to be segmented. |
|
ModelName - Defines the name of the model. |
|
SegmentationFormat - Optional argument; Defines the desired output format, e.g. Multi-Channel or Labels |
|
Zen.Processing.Segmentation.MinimumConfidence |
Addresses the Minimum Confidence function. |
|
ZenImage - Defines the input image to be segmented. |
|
ZenImage - Confidence map containing the confidence values in %. |
|
Minimum Threshold – value in % - only pixel inside mask >= these values will be kept. |
|
ZenIntellesis.GetAvailableFeatureSets() |
Returns all available feature sets as an array of strings. |
|
ZenIntellesis.GetAvailablePostProcessings() |
Returns all available post-processing options as an array of strings. |
|
ZenIntellesis.ImportModel (modelfile, allowOverwrite) |
Imports a model file into the model repository and overwrites an existing one, if the option was set to True. Returns a ZenIntellesisModel. |
|
File path to modelfile to be imported. |
|
Allows overwriting an existing model. |
|
ZenIntellesis.ListAvailableSegmentationModels() |
Lists all available segmentation models. Returns an array of ZenIntellesisModels. |
Remarks and Additional Information
- Segmentation performance in general depends among other factors on the system performance, the available and free RAM and GPU memory.
- Whenever using Intellesis Segmentation it is strongly recommend not to use other memory- or GPU-intensive applications at the same time.
- Deep Feature Extraction uses the GPU (NVIDIA only) if present on the system. It is recommended to use a GPU with at least 8GB of RAM.
- When installing the GPU libraries it is required to use the latest drivers which can be obtained from the NVIDIA homepage (https://www.nvidia.com/Download/index.aspx?lang=en-us).
- In case of using an approved ZEISS workstation, the latest drivers can be found on the installer.
- When using Deep Feature Extractor on a GPU system, Tensorflow will occupy only as much as GPU RAM as needed to ensure system stability. When the segmentation is finished this GPU memory is released automatically.
- Therefore, when starting another GPU-intensive application, the GPU memory cannot be used by this new process and a CPU fallback will be used or performance issues may occur.
- In this case, restart the software to free all possible GPU memory and then start using the GPU-intensive application.
Intellesis Segmentation Tool
|
Parameter |
Description |
|
|---|---|---|
|
Model |
Shows the selected model. If you have several models available, you can select the corresponding model from the drop-down list. |
|
|
|
||
|
– |
New |
Creates a new, empty model, see Creating and Training an Intellesis Segmentation Model. |
|
– |
Rename |
Renames an existing model, see Renaming an Intellesis Segmentation Model. |
|
– |
Clone |
Clones (duplicates) an existing model, see Cloning an Intellesis Segmentation Model. |
|
– |
Create Analysis Setting |
Creates and stores a *.czias file in the specific folder for image analysis settings, see Creating an Image Analysis Setting from an Intellesis Segmentation Model. The file can then be used in the Analysis Wizard. |
|
– |
Import |
Imports a model to the ZEN software, see Importing an Intellesis Segmentation Model. |
|
– |
Export |
Exports the model to the file system, see Exporting an Intellesis Segmentation Model. |
|
– |
Export With Images |
Exports the model including all images to the file system, see Exporting an Intellesis Segmentation Model with Images. |
|
– |
Delete |
Deletes an existing model, see Deleting an Intellesis Segmentation Model. |
|
– |
Change Border Size |
Only available for deep learning networks. |
|
Description |
Displays a description of the selected model. |
|
|
Postprocessing |
Selects a postprocessing, see Postprocessing Options |
|
|
– |
No Postprocessing |
No postprocessing will be applied on the images. |
|
– |
Conditional Random Field |
If selected, this post processing function is applied to the output of the pixel classification. The CRF algorithm tries to create smoother and shaper borders between objects by re-classifying pixels based on confidence levels in their neighborhood. |
|
Start Training |
Opens the Training UI, see Training User Interface Intellesis Segmentation |
|
ON THIS PAGE
- Intellesis Segmentation
- Licensing and Functionalities of Intellesis Segmentation
- Fact Sheet
- FAQ/Terminology
- Operating Concept Intellesis Segmentation
- Workflow Overview for Intellesis Segmentation
- Editing Classes
- Importing Labels from Binary Mask
- Converting Segmentations to Labels
- Using Pretrained Deep Learning Networks for Image Segmentation
- Segmenting an Image Using the Intellesis Segmentation Image Processing Function
- Performing an Image Analysis Using an Intellesis Segmentation Model
- Changing the Tile Border Size for Deep Learning Networks
- Using Intellesis Segmentation Models in OAD
- Remarks and Additional Information
- Intellesis Segmentation Tool