Intellesis Denoising
This module allows you to train and use deep learning based models for the denoising of images. This method can be applied to any type of image and any dimensions and it is not dedicated to a special field of application. It should be used before applying processing functions that modify the pixel values to that image.
Denoising is an operation to reduce noise in an image, in case of Intellesis Denoising with the help of deep learning methods. In general, there are different ways to train a denoising model. Intellesis Denoising uses the approach called Noise2Void (N2V), which requires only a noisy input image for the training of a model and can thus be trained directly on the data that should be denoised. To give a simplistic explanation, this N2V method replaces pixels by masked pixel data randomly selected within a certain window/surrounding area. With this approach, the model is then trained to reconstruct the original pixels and to discard the implicit noise in the image. For detailed information on Noise2Void , see the paper "Noise2Void - Learning Denoising from Single Noisy Images" written by Alexander Krull, Tim-Oliver Buchhol and Florian Jug, see also https://arxiv.org/abs/1811.10980.
Licensing and Functionalities of Intellesis Denoising
Some functionality of Intellesis Denoising is generally available in ZEN, but the full functionality requires the AI Toolkit license.
Basic functionality
The general available functionality includes:
- Importing and exporting models.
- Managing the models, including renaming and deleting.
- Running a model with the Intellesis Denoising function on the Processing tab or in OAD (if you have licensed the Developer Toolkit).
- Running a model as part of the Live Denoising functionality to denoise the images during a continuous acquisition, see Using Denoising During Continuous Acquisition.
Licensed functionality
If you have licensed this functionality and activated it under Tools > Toolkit Manager, the following additional functionality is available:
- Creating and training a new model.
- Retraining an existing model.
Creating and Training an Intellesis Denoising Model
- You have licensed the AI Toolkit and activated it under Tools > Toolkit Manager.
- If required, you have pre-processed your image(s) with the Whitening function, see Whitening.
- On the Analysis tab, in the Intellesis Denoising tool, click
 and select New.
 - Enter a name for the new model and click
 . Alternatively, enter the name and press Enter.
 - A new setting with the name is created and automatically selected as Model.
- Click Start Training.
- The user interface for training opens.
- In the Images and Documents section on the right, click Import Images.
- A file browser opens.
- Select the image(s) you want to use for classification and click Open.
- For images with multiple channels, a dialog opens to select the channel for denoising.
- Select the channel you want to use for denoising and click OK.
- The image is displayed in the list in the Images and Documents section. Note that all imported images are included in your model.
- Select the image from the list.
- The image is displayed in the left image container.
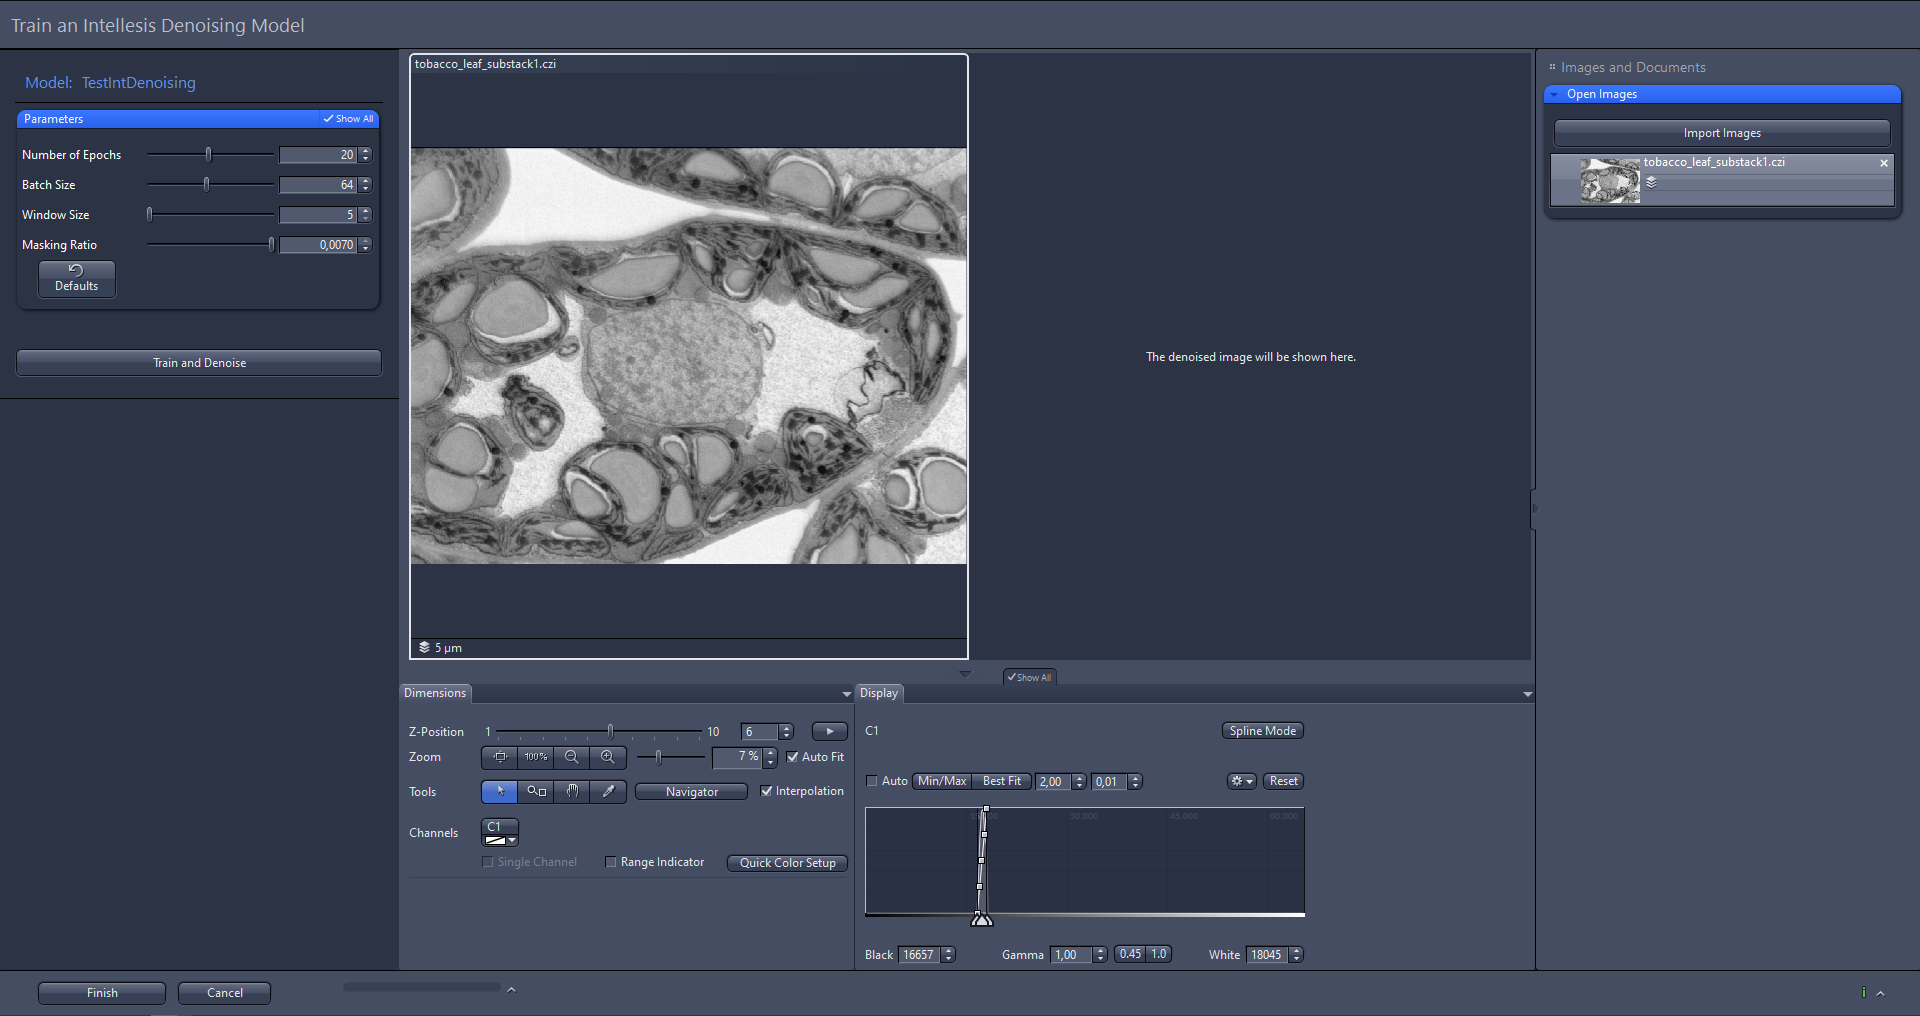
- In the parameter section, set the Number of Epochs and adapt the more advanced parameters, if necessary.
- Click Train and Denoise.
- Your model is trained based on the settings and the prediction is displayed in the right image container.
- If you are satisfied with the result, click Finish.
- All changes are saved, and the training window closes.
- You have successfully created and trained a model for denoising. You can now use it to denoise your images with the Intellesis Denoising image processing function, see Using an Intellesis Denoising Model for Image Processing, or use it during a continuous acquisition, see Using Denoising During Continuous Acquisition.
Importing an Intellesis Denoising Model
- You have a trained denoising model available which you want to import.
- You are on the Analysis tab.
- In the Intellesis Denoising tool, click
 and select Import.
 - A file browser opens.
- In the file browser, select the model file from the file system and click Open.
- The model is now available in the dropdown list.
- You have imported a model for denoising. You can now use it to denoise your images with the Intellesis Denoising processing function, see Using an Intellesis Denoising Model for Image Processing, or use it during a continuous acquisition, see Using Denoising During Continuous Acquisition.
Exporting an Intellesis Denoising Model
- You have a denoising model available.
- On the Analysis tab, in the Intellesis Denoising tool, select the model you want to export in the dropdown.
- Click and select Export.
- A file browser opens.
- Select the file location and click Save.
- The model is exported. It contains the trained routine to denoise an image and is not intended for the training process anymore.
Using an Intellesis Denoising Model for Image Processing
- You have a denoising model available.
- You have opened the image(s) for which you want to use the model.
- If required, you have pre-processed your image(s) with the Whitening function, see Whitening.
- On the Processing tab, select the Intellesis Denoising method.
- The settings are displayed in the Parameters tool.
- In the Parameters tool, select the Model you want to use. If you have several CUDA capable GPUs, select the GPU that should be used for running the denoising model.
- The parameters are set up.
- To select different models for individual channels of a multi-channel image, activate Adjust per Channel.
- The tool displays all channels as a list and the currently selected channel is highlighted.
- Select a model for each channel and use the dropdown to select whether to process it.
- The parameters are set up.
- Click Apply.
- The objects in your image are denoised based on the trained model.
Intellesis Denoising Tool
|
Parameter |
Description |
|
|---|---|---|
|
Model |
Displays the selected model. If you have several models available, you can select the corresponding model from the dropdown list. |
|
|
|
||
|
– |
New |
Creates a new, empty model. |
|
– |
Rename |
Renames the selected model. |
|
– |
Clone |
Clones (duplicates) the selected model. |
|
– |
Import |
Imports a denoising model to ZEN, see Importing an Intellesis Denoising Model. |
|
– |
Export |
Exports the selected model to the file system, see Exporting an Intellesis Denoising Model. |
|
– |
Delete |
Deletes the selected model. |
|
Description |
Displays and sets a description for the selected model. |
|
|
Start Training |
Opens the user interface for training. |
|