Training User Interface Intellesis Segmentation
When you use images with large X/Y dimensions, e.g. large tile images, the segmentation will be only performed on a subset of the whole image in order to avoid long waiting periods. The current image subset maximum size in X/Y is 5000 pixels and is centered on the current view port. Nevertheless, all labels inside the complete image will be used for training, but the segmentation preview (pseudo-segmentation) will only be applied to that subset.
|
1 |
Image Labeling and Training Here you can load the desired images for training, set up the required classes and select the options for segmentation. |
|
2 |
Image Area |
|
3 |
Labeling Options |
Intellesis Training Options
Selects the set of feature extractors used for training Intellesis segmentation models, see Feature Extractors. Keep in mind that there is no definitive 'correct' selection of parameters. It is advisable to experiment with various parameters for the same image to determine which configuration yields the best results.
|
Parameter |
Description |
|---|---|
|
Basic Features 25 |
A predefined feature set using 25 features, see Basic Features 25. |
|
Basic Features 33 |
A predefined feature set using 33 features, see Basic Features 33. |
|
Deep Features 50 Deep Features 64 Deep Features 70 Deep Features 128 Deep Features 256 |
The complete or reduced feature set from either the 1st, 2nd or 3rd layer of a pre-trained network is used to extract the respective number of features, see Intellesis Deep Features or the respective Zeiss GitHub page. |
Postprocessing Options
|
Parameter |
Description |
|---|---|
|
No Postprocessing |
This parameter is set by default. No further postprocessing will be applied on the images. |
|
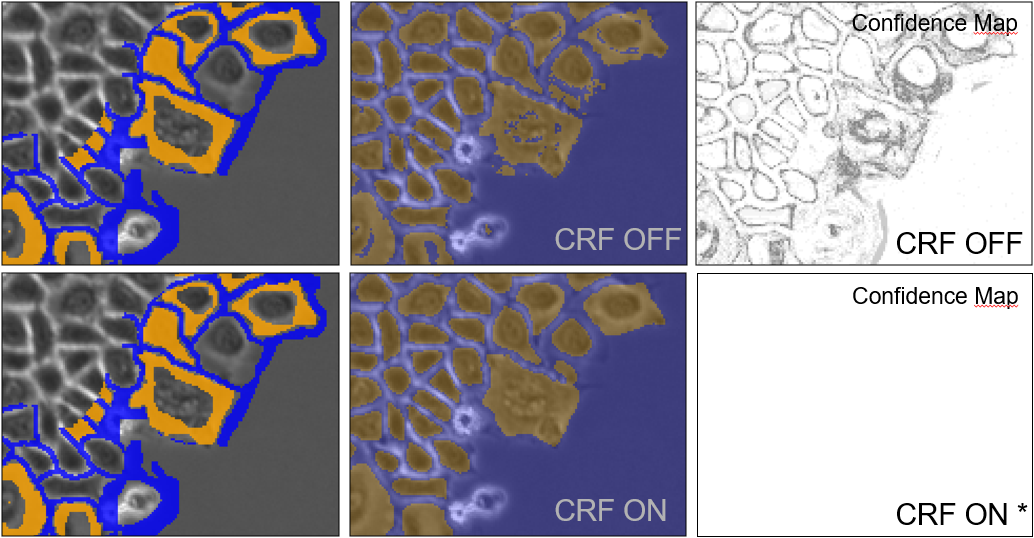
Conditional Random Field (CRF) |
If selected, this post processing function is applied to the output of the pixel classification. This can improve the segmentation results, depending on your sample. The CRF algorithm tries to create smoother and shaper borders between objects by re-classifying pixels based on confidence levels in their neighborhood. Note: If CRF is activated, the returned confidence map does not reflect the outcome of the majority votes of all decision trees of a specific class anymore. Therefore, a map containing only ones will be returned when the CRF postprocessing option is activated. |
Labeling Options
|
Parameter |
Description |
|---|---|
|
Undo/Redo |
When you click on the arrows you can undo/redo the last actions you have performed. |
|
Labeling Mode |
Here you can select between labeling and erase mode. To switch the labeling mode, you can also use the shortcut Ctrl + D. |
|
Brush Size |
Here you can set the brush size of the labeling/erasing tool. Note that the brush size can be changed alternatively by pressing the Ctrl key and using the mouse wheel (when the cursor is inside the image area.) |
|
All Labels |
When you click on Clear, all labels in the active image will be deleted. |
Image Import Section Intellesis Segmentation
Here you can load and select the images you want to use for training. When you click on a loaded image, the image will be visible in the Image Area.
|
Parameter |
Description |
|---|---|
|
Import from Archive |
Opens a dialog to browse the archive to select the image for import. The image is copied to the location defined under Maintenance > General Options > Intellesis. |
|
Import Images |
Opens a file browser to select the image for import from a location on your hard drive. |
|
Image list |
Displays the list of imported images. If you load a new image only the preview image, file name and type of image are displayed. As soon as you have started to label an image of a larger data set, a list of the images that contain labels is displayed, containing dimension and image number (e.g. for a z-stack, Z:400 indicates that the slice number 400 contains labels). If you click on this information, the corresponding image is automatically displayed in the center screen area. This is very helpful when you are working with large data sets such as z-stacks, scenes or time-series and you want to quickly load the image you have already labeled. |
Select Channel Dialog
This dialog is only displayed if a multi-channel image is imported.
|
Parameter |
Description |
|
|---|---|---|
|
Training Mode |
Here you can select the mode for training. |
|
|
– |
Single Channel |
Only one channel of the image is imported for training. |
|
– |
Multispectral |
All channels of the image are imported for training. |
|
Select Channel |
Only visible if Single Channel is selected as the training mode. In the drop-down list you can choose the channel you want to import for training. |
|
|
OK |
Confirms the settings and imports the image accordingly. |
|
|
Cancel |
Cancels the image import and closes the dialog. |
|