ZEN Data Storage Client
Time Deviation
In the very unlikely event that there is a time deviation greater than five minutes between the client and the server, the authentication of the client fails for security reasons. In this case an error message is displayed and working with ZEN Data Storage is not possible. You have to fix the system time of the client and/or server before a retry.
In ZEN core, you can store your data on your computer's file system in your local archive, or you have the option to save your data in a database called ZEN Data Storage.
ZEN Data Storage is an additional product which has to be installed. For more information, refer to the installation guide of ZEN Data Storage. You also need configure ZEN Data Storage as your archive, see Configuring a ZEN Data Storage Archive.
Configuring a ZEN Data Storage Archive
The archive options enable you to specify how and where the Archive is stored, as well as the hierarchy of attributes that can be assigned to templates.
The Archive Setup button needs to be clicked once for the first client to set up the database. On the second client, this is not necessary anymore, even though the button is active.
- You are logged in as an administrator in ZEN core.
- You have configured a ZEN Data Storage Server and activated the Data Storage Client module in Home Screen > Maintenance > Toolkit Manager.
- Click Home Screen > Maintenance > Archive Options.
- The Archive Options dialog opens.
- As Archive Type, select ZEN Data Storage Archive from the drop-down list.
- Only if you have selected ZEN Storage Archive as archive type, you can setup the Archive.
- For Settings > URL specify the URL of the ZEN Data Storage server.
- The Archive Setup button is displayed.
- If you want to use an archive hierarchy, create your hierarchy elements by clicking +, see Creating a hierarchy for the archive and Using a hierarchy for the archive for general information.
- Click Archive Setup. This has to be done only on the first system which connects to the ZEN Data Storage.
- The storage is set up to work with the software and the standard users are created.
- Restart the software to update the user database.
- You have set up the ZEN Data Storage Archive as your archive and the database is set up properly. You can now configure the user management, see Basics of User and Group Management.
Opening an Image from ZEN Data Storage
- You have added the Load image from ZEN Data Storage tool to the Load File workbench.
- In the Load image from ZEN Data Storage tool, click
 .
. - The Browse ZEN Data Storage dialog opens, see Browse ZEN Data Storage Dialog.
- If necessary, filter the displayed images form the database, see Filtering Data in ZEN Data Storage.
- Select an image in the list and click OK. Alternatively, double-click the respective image.
- The Browse ZEN Data Storage dialog closes.
Filtering Data in ZEN Data Storage
- You have added the Load image from ZEN Data Storage tool to the Load File workbench.
- In the Load image from ZEN Data Storage tool, click .
- The Browse ZEN Data Storage dialog opens.
- Enter a term you are looking for in the Search field, e.g., the file name.
- The displayed images are filtered instantly based on your input.
- To filter images based on their tags, click Tags.
- An input field opens as drop-down.
- In the search field, enter a term you want to filter for. Alternatively, in the list of available tags, activate all tags you want to filter for and activate Or/And, depending on whether the filtered images should contain all activated tags (And), or at least one of the tags (Or).
- The filter for tags is applied.
- The available files are filtered and displayed accordingly.
Creating a Collection for Data
You can create collections to structure your data and share it with others.
- You have set up ZEN Data Storage as your archive, see Configuring a ZEN Data Storage Archive.
- You have started the application with active user management to be able to add users or groups to a collection.
- Click Home Screen > Maintenance > Archive Options.
- Click Manage Collections.
- The Manage Collections dialog opens.
- Click
 .
. - The Add Collection dialog opens.
- Enter a name for the new collection.
- Click .
- The Add Collection Access dialog opens.
- On the Groups and/or Users tab, select the group or user you want to grant access to the collection. Selection of multiple users and groups is possible by pressing Ctrl.
- Select the Access Level for the currently selected users/groups.
- Click OK.
- The dialog closes and the selected users and/or groups are granted access based on the selection.
- You can now adapt the Access Level of individual users and groups of this collection, if necessary.
- Click OK.
- The Add Collection dialog closes.
- You have created a collection for your data. You can now structure your data and share job results with the people having access to this collection, see Adding Job Results to Collections in Browse Results.
Editing or Deleting a Data Collection
- You have created a collection for your data. For more information, see Creating a Collection for Data.
- You have started the application with active user management to be able to add users or groups to a collection or edit them.
- Click Home Screen > Maintenance > Archive Options.
- Click Manage Collections.
- The Manage Collections dialog opens.
- To delete a collection, select it and click
 .
. - To edit a collection, select it and click
 .
. - The Edit Collection dialog opens.
- If you want to change the name, adapt it under Collection Name.
- If you want to change the access of a particular user, change the Access Level with the respective dropdown.
- To add a new user or group, click .
- The Add Collection Access dialog opens.
- On the Groups and/or Users tab, select the group or user you want to grant access to the collection. Selection of multiple users and groups is possible by pressing Ctrl.
- Click OK.
- The dialog closes and the selected users and/or groups are granted access based on the selection.
- Click OK.
- The Edit Collection dialog closes.
- Click Close.
- The Manage Collections dialog closes.
Sharing Job Results in Free Mode
- ZEN Data Storage is configured as your archive, see Configuring a ZEN Data Storage Archive.
- You are in Free Mode and have finished all your work.
- In the Title Bar, click
 and click Archive Results.
 - The Archive Results dialog page opens.
- Click Select Collections to which saved Results should be added to.
- The section with all available collections is displayed. Every collection that is shared with other users/groups is marked with
 in the Shared column.
 - If you want to search for a particular collection, input your search term in the Search for Collections field.
- The collections displayed in the table are updated accordingly.
- In the table, activate the checkbox for each collection the result should be shared with.
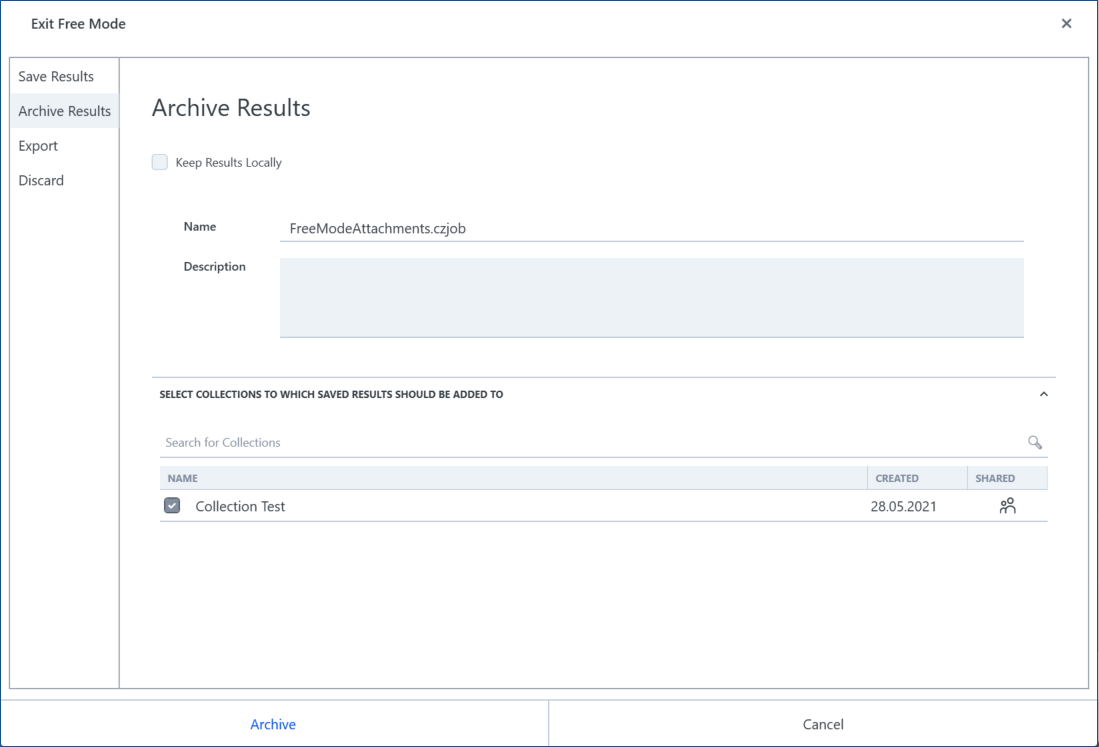
- Click Archive.
Sharing Job Results in Job Mode
- ZEN Data Storage is configured as your archive, see Configuring a ZEN Data Storage Archive.
- You are in Job Mode and have finished your Job.
- Click Save and Close. Alternatively, click Save and Repeat if you want to repeat the job afterwards.
- The Save Results dialog opens.
- Click Select Collections to which saved Results should be added to.
- The section with all available collections is displayed. Every collection that is shared with other users/groups is marked with in the Shared column.
- If you want to search for a particular collection, input your search term in the Search for Collections field.
- The collections displayed in the table are updated accordingly.
- In the table, activate the checkbox for each collection the result should be shared with.
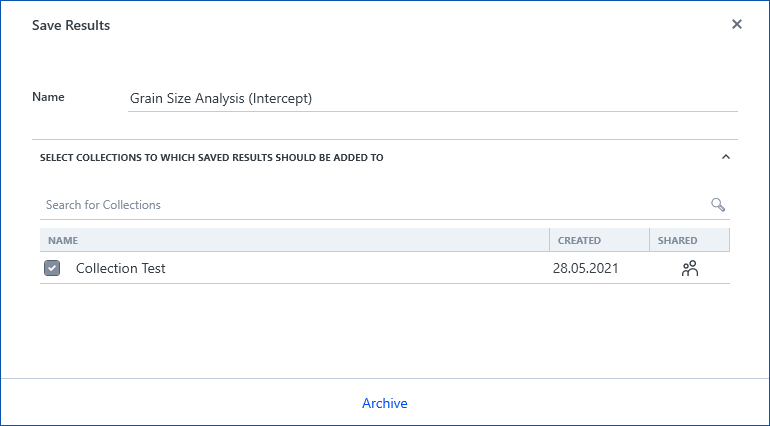
- Click Archive.
Creating Custom Metadata
With ZEN Data Storage, you can create and use custom metadata in ZEN core.
- You have ZEN Data Storage configured as your archive, see Configuring a ZEN Data Storage Archive.
- You are on the Home Screen.
- Click Maintenance > Archive Options.
- The Archive Options dialog opens.
- Under Settings, click Custom Metadata.
- The Custom Metadata tab opens and all custom metadata entries are displayed.
- Click .
- A new empty field is created.
- Enter the name for your custom metadata and press Enter.
- Click OK.
- The Archive Options dialog closes and the new metadata entry is saved.
- You have created custom metadata that are displayed in the Custom Metadata tab of the Archive Options dialog. Note that custom metadata are created case insensitive.
- The custom metadata can be used for your jobs by adding them as a Data Link field property in the Form Designer when creating or editing a form template, see Form Designer.
- When running a job which includes the form with custom metadata, you can enter a value for the metadata. Additionally, all previously entered values for the respective metadata are available as a dropdown list and sorted alphabetically.
- The custom metadata can be displayed as a column in Browse Results and can be used as additional filter criteria for searching the job results, see Filtering Results and Documents using Metadata and Filter Criteria.
Adding an Active Directory User
Domain Administrator
It is not possible to use the initial Active Directory domain administrator as a user for ZEN Data Storage. The administrator account for the Active Directory domain should only be used for the administration of the Active Directory itself.
When you are using ZEN core with ZEN Data Storage, you can add individual Active Directory users to your user management.
- ZEN core is open with active user management and you are signed in as administrator.
- You have ZEN Data Storage configured as your archive and have configured an Active Directory group, see Configuring a ZEN Data Storage Archive and Setting up the Login with Windows Credentials (Active Directory) respectively.
- During the installation of ZEN Data Storage, you have set the parameter Enable Active Directory to True on the Settings tab of the installer. For more information also refer to the installation guide for ZEN Data Storage.
- The ZEN Data Storage server must be part of the same Windows domain from where the software tries to login with its Windows credentials.
- Click Maintenance > User Management.
- The User and Group Management dialog opens.
- Click Users.
- The tab displays all currently configured users.
- Click .
- The New User dialog opens.
- For Type, select Active Directory.
- For Name, click .
- The Select User dialog opens.
- The fields for object type and location are filled with a default. To change them, click Object Types or Locations to open another dialog to select the respective Object Types or Locations.
- In the text field below, enter the name of the user you want to select. If you are not sure if your name is correct, click Check Names to open a dialog and select the suitable entry.
- Click OK.
- The name is displayed in the New User dialog.
- Click OK to close the New User dialog.
- The respective Active Directory is added to the list of users.
- Click OK to close the User and Group Management dialog.
- You have configured an Active Directory user. You can now assign this user to a group to grant him certain rights and privileges.
Add to Collection Dialog
|
Parameter |
Description |
|
|---|---|---|
|
Search for Collections |
Searches the collections according to the input. |
|
|
Table |
Displays all available collections. |
|
|
– |
Name |
Displays the name of the collection. Activated: The image is shared with the respective collection. |
|
– |
Shared |
Shared collections are marked with |
|
Manage Collections |
Opens the Manage Collections dialog to manage the collection. |
|
|
Save |
Saves the changes and closes the dialog. |
|
|
Cancel |
Closes the dialog without saving. |
|
See also
Manage Collections Dialog
Here you can manage collections for your data and specify their access.
|
Parameter |
Description |
|
|---|---|---|
|
Collection table |
Displays the existing collections. |
|
|
– |
Collection Name |
Displays the name of the collection. |
|
– |
Collection Owner |
Displays the owner of the collection. |
|
– |
Access Granted To |
Displays the groups/users that have access to this collection. |
|
– |
|
Opens the Add Collection dialog to add a collection. |
|
– |
|
Deletes the selected collection. |
|
– |
|
Opens the Edit Collection dialog to edit the selected collection. |
See also
Share and Manage Access Dialog
|
Parameter |
Description |
|
|---|---|---|
|
Enter Name |
Searches all available users and groups according to the input and selects a user or group from a dropdown. |
|
|
Access Rights dropdown |
||
|
– |
Read |
Grants the group/user access to see, open and download a document. |
|
– |
Write |
Grants the group/user access to modify a document. |
|
– |
Manage |
Grants the group/user access to modify the access control list. |
|
Add |
Adds the selected user or group with the selected access right to the table. |
|
|
User and Group table |
Displays all users and groups added for sharing the file. |
|
|
– |
User or Group |
Displays the name of the user or group. |
|
– |
Access Right |
Displays the access right for the respective user or group and allows you to change the access. |
|
– |
Remove |
Removes the entry by clicking the button. |
|
Save |
Shares the file with the users and groups defined here and closes the dialog. |
|
|
Cancel |
Closes the dialog without sharing the file. |
|
See also
Load image from ZEN Data Storage Tool
This tool enables you to load an image from the ZEN Data Storage.
|
Parameter |
Description |
|
|---|---|---|
|
File Name |
Displays the name of the selected file. |
|
|
– |
|
Opens the Browse ZEN Data Storage Dialog to select an image. |
|
Last Changed |
Displays information on when the file was last changed. |
|
ON THIS PAGE
- ZEN Data Storage Client
- Configuring a ZEN Data Storage Archive
- Opening an Image from ZEN Data Storage
- Filtering Data in ZEN Data Storage
- Creating a Collection for Data
- Editing or Deleting a Data Collection
- Sharing Job Results in Free Mode
- Sharing Job Results in Job Mode
- Creating Custom Metadata
- Adding an Active Directory User
- Add to Collection Dialog
- Manage Collections Dialog
- Share and Manage Access Dialog
- Load image from ZEN Data Storage Tool