Basic Concepts
User Interface - Home Screen
The Home Screen is displayed after you log in. The available operating modes depend on your user role.
|
1 |
Title Bar Includes the View menu to zoom the workspace. |
|
2 |
Operating Modes selection, see Operating Modes. |
|
3 |
Displays system messages and the synchronization status. |
Operating Modes
The software contains different operating modes that correspond to the different ways of working with the microscope. The modes that are available to you depend on your user role.
|
Icon |
Mode |
Description |
|---|---|---|
|
|
Free Mode |
Inspect a sample quickly, easily, and flexibly without defining examination tasks. |
|
|
Job Mode |
Run an examination on a sample according to the step-by-step tasks defined in the job template. Also, define fixed examination steps to be performed each time a sample is examined. |
|
|
Manage Templates |
Edit and manage templates in the archive:
|
|
|
Browse Results |
View and manage job results in the archive. |
|
|
Maintenance |
Configure global settings, manage users, calibrate measurements, etc.. |


See also
Job Mode and Free Mode
is designed to support two fundamental ways of using your microscope:
- Working with jobs (creating, running, editing and managing jobs) in Job Mode
- Performing free examinations in Free Mode
Job Mode
In the software, the term job refers to a collection of examination tasks. Jobs can be created to ensure that the same examination tasks are carried out each time the job is run, in the same manner, and with the same settings. Jobs are used mainly in routine quality control examinations where it is essential that identical examinations are performed for each sample.
Free Mode
Free examinations can be used to inspect a sample quickly, easily, and flexibly without defining examination tasks. A typical use is to examine a faulty sample where the cause of the fault is unknown or for one-off examinations that will not be repeated. In such cases only the examination results, reports and images need to be saved rather than the examination tasks.
Customizing Workspace Zoom and Background Color
You can switch the background color and modify the workspace zoom.
Setting the background color
- In the Title Bar, select View > Theme > Dark or Light respectively.
- The theme changes accordingly.
Zooming in and out the workspace
- In the Title Bar, select View > Workspace Zoom and set the zoom level to comfortable view.
- The size of the view changes accordingly.
User Roles
User management is an optional component. It is disabled by default. If user management is disabled, the user has all user rights at the same time. When user management is enabled, three types of user roles are defined initially in the software:
- Administrator
- Supervisor
- Operator
The available modes and tasks you can perform in the software depend on your user role. User roles can be added and modified under Maintenance > User Management.
|
User Role |
Tasks |
|---|---|
|
Administrators |
Administrators install and configure the software. This includes:
|
|
Supervisors |
Supervisors perform the following main tasks:
They are also able to perform the following tasks:
|
|
Operators |
Operators can only perform a limited number of tasks:
|
See also
Overview of Supervisor Tasks
As a supervisor, the way you perform the majority of individual tasks is independent of whether you are in Free Mode or within Job Mode.
For a detailed overview of the tasks in each mode see:
- Operating Modes
- Workflow Create Job Template
- Workflow Free Mode
The tasks that are independent of a mode are described in a corresponding chapter in the order they are typically performed.
Workbenches and Workbench Categories
The workbenches that are available depend on the available hardware and licenses.
The appearance of workbenches and how you use them depends on the current mode.
The software is based around the concept of workbenches. In , the term Workbench refers to a group of tools in the software. Furthermore, a workbench typically corresponds to a task in the software. Workbenches also affect the appearance of the Center Screen Area.
Workbenches in turn are grouped into categories. The categories correspond to the typical microscopy tasks, e.g.:
- Acquisition
- Processing
- Measurement etc.
|
1 |
Workbench bar with selected workbenches |
|
2 |
Workbench category |
|
3 |
Workbench selection |
Typically, there are multiple workbenches in each category. For example, for image acquisition the following workbenches (amongst others) are available:
- Simple acquisition, e.g. 2D Acquisition
- Advanced acquisition, e.g. Tiles
Workbenches enable you to concentrate on your microscopy tasks by providing the tools you require while keeping the user interface uncluttered.
The tools contained in a workbench can also be present in multiple other workbenches. As a supervisor you can create new workbenches or modify existing ones by adding and removing tools according to your requirements. These customized workbenches can be saved as new workbenches and reused in other examinations or by other users.
See also
Creating and Using Custom Workbenches
You can add or remove tools from a workbench at any time. You can also save a workbench configuration as a custom workbench. This enables you to use it in other job templates or free examinations.
All custom workbenches are saved and managed in the Archive.
In Create a new template and edit it within Job Mode, each workbench is automatically saved in the job template in its current configuration. It is also displayed in the same configuration when running the job.
Creating a custom workbench
- Customize your workbench by adding or removing tools.
- Right-click the icon of a workbench and select Save as custom workbench.
- Enter a name for the custom workbench.
- The name is used to identify the workbench and must be unique within the system.
- Enter a description for the workbench.
- It should describe the purpose or special features of the workbench to help other users know when to select it.
- Click Save to save the custom workbench.
Using a custom workbench
- Click + Add Task.
- Select the My Workbenches category.
- Select the desired custom workbench and click + Add.
To ensure data integrity, it is not possible to overwrite existing default or custom workbenches.
Tools and Parameters
Tools enable you to perform a specific action in the software, for example:
- Acquiring an image
- Selecting a different hardware magnification
- Reducing the noise
- Measuring a length
|
1 |
Workbench |
|
2 |
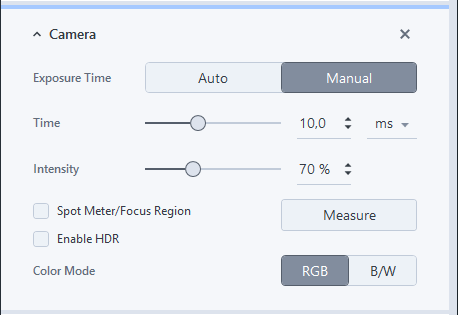
Tool (e.g. Camera tool) In order to prevent scrolling if you have added several tools, you can collapse the tools by clicking the tool header:
Click the tool header again to expand the tool:
Your settings are persisted. When you leave the Free Mode, the current state of each tool (collapsed/expanded) is saved. |

The tools contained in a workbench may also be present in multiple other workbenches. As a supervisor you can also create new workbenches or modify existing ones by adding and removing tools according to your requirements. These customized workbenches can be saved as new workbenches and reused in other examinations or by other users.
Templates, Images, and Documents
The software supports various kinds of objects grouped into the following categories:
- Templates
- Documents
The software handles the objects differently depending on where they are managed or how you interact with them.
Templates
Templates contain pre-defined content, for example the tasks required to run a job, or the fields required to complete a form.
Templates include, for example, the following objects:
- Job templates
- Free Mode setups
- Form templates
- Report templates
- Custom workbenches
- Image analysis
- Macros
Templates are managed in the archive. When your workflow requires selecting one of the above items, e.g. choosing a job template to run or a report template to use, you are presented with the items stored in the archive. In general, you only interact with items in the archive; you do not interact with the file system.
Documents
Various document types exist, for example:
- Images
- Data tables that contain for example measurement results
- Forms
- Tables
- Reports
During examination, the software generates documents that are archived in the local storage or in the archive. However, you can load and save documents to/from the file system by using tools in workbenches. You also have the option to export and import results or result documents.