ZEISS Microscopy Knowledge Base
Help
ZEISS Microscopy Knowledge Base
Search
Defining Length and Width Classes (Center Screen Area)
The predefined size classes are given by the corresponding standard.
- You have defined the settings in the Workbench Area.
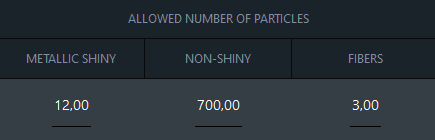
- Proceed to the Center Screen Area and set your settings. Define individual acceptance criteria by the allowed number of particles per size class. Add limit values for the allowed number of particles per size class, see example below.
- The result is displayed in the Size Distribution view, see Class Chart - Length Class Table. The result of the acceptance criteria is displayed in green color indicating particle counts are below the defined limit values; red color means that particle counts are above defined limit values.
- Define particle size classes for height measurement of particles. Activate the size classes considered for particle height measurement, e.g., METALLIC SHINY and NON SHINY for component cleanliness standards, or PARTICLE for oil cleanliness standards.
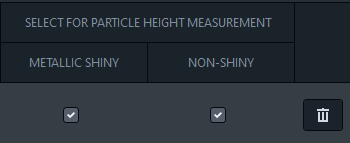
- The pre-selected particles are automatically marked in the gallery of the Size Distribution view of the job run. Additionally, you can mark or unmark desired particles manually in the Particle Gallery, see Particle Height Measurement.
- Define a selection of particles automatically provided for EM/EDS analysis in a correlative workflow. Execute the TCA workflow as usual. For a correlative LM/EM-EDS workflow continue in Free Mode and load the S&F Find (List) tool to retrieve the particles for subsequent EDS analysis, For more information, see Correlative Workflows
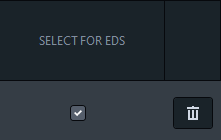
- By selection of a certain particle size class all particles belonging to this size class are added automatically to the archived EDS particle selection table.
- Modify the particle size classification for the definition of individual company standards.
![Table with headers NAME, COLOR, LENGTH [µm] showing row E color bar lower 50 upper 100 and row F color bar lower 101 upper 150](https://ariviskbprdwe.blob.core.windows.net/cdn/downloads/blobs/534acb406b8fe5ee9bb27654c474d318.webp)
- The red numbers indicate that the entered values are wrong. A tool tip informs you on the error.
- To add a new row for defining the next particle size class, click the Add Class button. Add size class values and a name for this size class.
- Click Next if you want to modify the size classes for width as well.
- The Define Width Classes step is displayed.
- Define the particle width classification in the same way as described before.
- Click Next.
- The step Define Approval Logic is displayed, see Defining the Approval Logic.
See also
Measurement Parameters for Length and Width Classification
The following size classification parameters are available: The default value for length is Feret Max and the default value for the width is Feret Min.
|
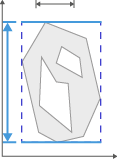
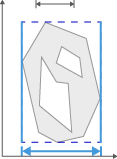
Length X |
|
Indicates the width (size in x-direction) of a bounding box for a region. The box is drawn in parallel to the x and y axis.
|
|
Length Y |
|
Indicates the height (size in y-direction) of a bounding box for a region. The box is drawn in parallel to the x and y axis.
|