NMI Global Results View
The Global Results view, the workbench and the view itself, provide an overview of the global inclusion types per standard and allows a fast inclusion inspection. In this view, you receive the information of the global inclusion types (Oxide, Sulfide, Nitride) and their size. In addition, artifacts, e.g. from scratches by specimen preparation, are identified.
Note that artifacts are not considered for further calculation and ratings.
By default, the following tools are active in the NMI Global Results on the left side of the workbench:
- Standard Selection tool
- The Standard Selection tool allows the selection of the desired standard results.
- Specimen Overview tool
- The Specimen Overview tool provides information on the specimen.
- Detected Objects tool
- The Detected Objects tool shows the standard specific global inclusion statistics.
Any time you change a selected standard, all galleries and statistic values are updated accordingly.
In the NMI Global Results view, you mainly perform these actions:
- Inspecting the results by filtering per object type, inclusion or artifact
- Changing the object type if required
For a better overview, in the Minimized view, you can use the arrow keys of your keyboard to move left and right. With the page up and down keys, you can scroll page wise through the gallery. If you selected a gallery image by clicking it, the currently selected row is displayed, e.g. Current row: 1/9115.
|
1 |
Inclusions button bar Filters inclusions or artifacts per type. You can view all inclusions clicking the All button, or filter the results with the following buttons: Oxides (O) button Sulfides (S) button Artifacts (A) button Nitrides (N) button |
|
2 |
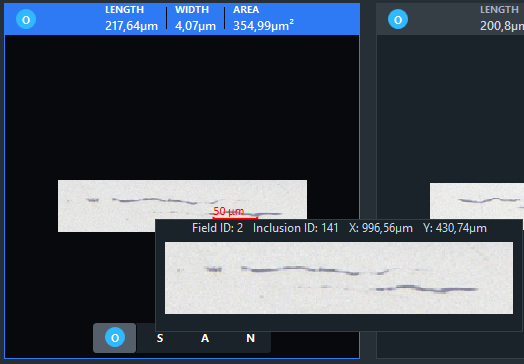
Gallery image with detected inclusion The data in the Info bar in the Minimized view and Mid-Sized view is only visible if you hover with your mouse over the gallery image. The data bar shows the inclusion size by length, width and area. In Minimized and Mid-Sized views, with the buttons O, S, N and A, you can change the inclusion type. In the Maximized view, with the buttons Oxide, Sulfide, and if existent Nitrides, as well as Artefact, you can change the inclusion type or revise an object as artifact. In Maximized view, the inclusion information is always visible. If you hover with your mouse over the gallery image, the field ID of the inclusion is displayed in a popup: |
|
3 |
Show Oversized Inclusions checkbox Displays inclusions that are in their width or length out of the range of the selected standard calculation. |
|
4 |
Show Annotations Displays the shape of the inclusion with a red line. |
|
5 |
View buttons bar Changes the number of gallery images per row. The following views are possible:
|
|
6 |
Drop-down menu Changes the sorting in the image gallery by inclusion length, width, area and ID. The default sorting order is descending for size: length, area, width, and ascending for the inclusion ID. |


You can open the NMI Global Results view from the Browse Job Results, when an NMI Inspection view document with the file name convention <job-result>.db is selected.
Changing Inclusion Type
In the Global Result view you can check and, if necessary, change the results of the inclusion typification.
It is not required to do the revision per standard. Each type revision has effect on the results of all standards.
- You have run the NMI Analysis either with image files or you acquired the images within the workflow.
- In the NMI Global Results view, hoover with your mouse over the desired gallery image.
- The following information about the inclusions is displayed on top of the image: length, width and area. On the bottom of the image, icons to change the inclusion type are displayed.
- To display additional information, hover with your mouse over the inclusion or artifact image.
- The inclusion image is shown zoomed out, the inclusion ID and X,Y inclusion coordinates are displayed on top of the zoomed out image.
- In the image, click the desired icon on the bottom to change the inclusion type or revise an object as artifact.
- The gallery image is marked by a red dot on the top left side to indicate a planned change of the inclusion type.

- To assign the new typification to the image, click on one of the filter buttons O, S, N, A, or click the Apply, button.
- The red dot disappears, the gallery is refreshed and the statistics is recalculated accordingly. This also happens, when you take the next step.
- You have changed the inclusion type.
- You can proceed with the NMI Analysis module workflow.